- Part One: Protecting AWS Credentials
- Part Two: Capturing and Analyzing Logs
- Part Three: Protecting Network and Host-level Boundaries
- Part Four: Protecting Data at Rest
- Part Five: Protecting Data in Transit
- Part Six: Configuring Data Backup, Replication, and Recovery
Part One: Protecting AWS Credentials
- Security is about protecting data.
The CIA Triad
- Confidentiality
- Integrity
- Availability
-
Confidentiality: Only authorized parties can access data. (ACLs and encryption)
-
Integrity: Data has not been improperly modified. Includes knowing if data has been modified.
-
Availability: Authorized parties have access to data when they need it. Includes protecting systems that store, process, and deliver data.
-
Defense in depth: Protecting the confidentiality, integrity, and availability of data by securing everything that touches the data, including storage, compute and networking
-
Levels of Architecture: AWS services, Operating systems, Applications
AWS Credentials
-
Root User: Full access to all AWS resources. Only one root user per account.
-
IAM principal: Any entity(could be a user or an application) that can perform actions on AWS services and resources. Policies determine what permissions a principal has
-
Locking down the Root user: Enable MFA. Don’t use the root user for administrative tasks. Use a non-root IAM user with administrative permissions
-
IAM Principal: The foundation of IAM. An entity that can take an action on an AWS service. Often used as a synonym for identity. Principles include users and roles
-
A non-root principal has no permissions by default. Policies determine what permission a principal has
-
You must grant permissions to a principal by associating it with a policy.
-
Policy and Permission: A policy consists of multiple permission statements. A permission statement consists of 4 elements.
- Effect (allow or deny)
- Service (etc: EC2)
- Action/Operation (RunInstances)
- Resource (image/ami-fjdfjfsdk)
- Request condition(MFA, IP range, time…) (198.51.100.0/24)
- This permission will allow a principal to run an EC2 instance with certain AMI, when it is in certain IP range.
- AWS managed policies: AWS has many managed policies created for us to use. (they are updated regularly to include new services)
- The deny effect always takes precedence over the allow effect (deny > allow)
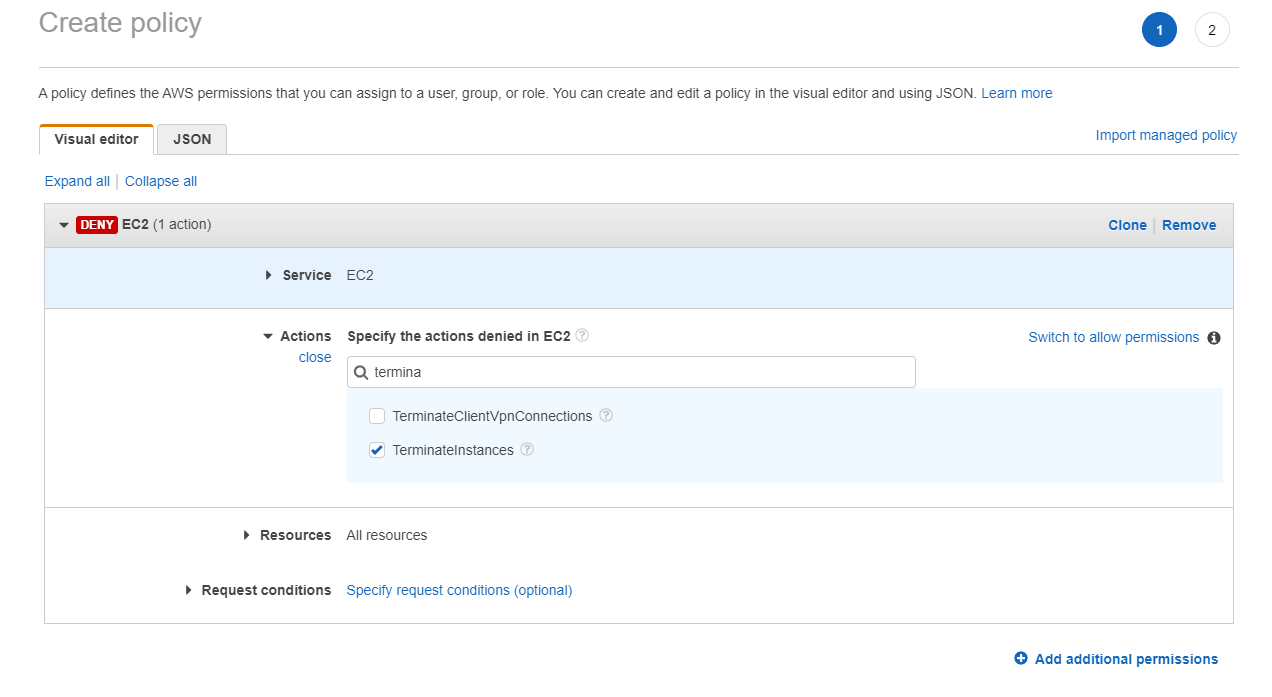
- We can create inline policy for a user to deny he’s access to terminate any EC2 instances.
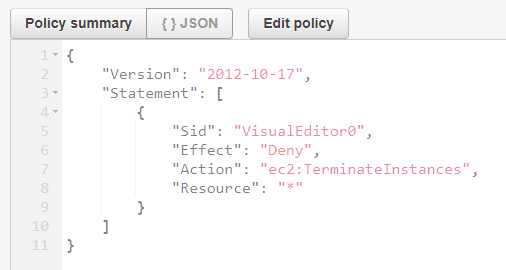
- This is the JSON representation of the policy

- We could use policy simulator to check the effectiveness of the policy.
- We could also create inline policy for a group.
Summary
- Implement MFA for the root user
- User an administrative user instead of root user
- AWS managed policies are updated as new services and actions are added
- A policy permission consists of an effect, service, action/operation and resource
- A user policy is an inline policy embedded in a user
- A group policy is embedded in a group
- Customer Managed policies work like AWS managed policies, but are created and managed by you
Part Two: Capturing and Analyzing Logs
Module Overview
- Capturing events with CloudTrail
- Viewing Logs with CloudWatch Logs
- Creating alerts with CloudWatch Alarms
- Searching logs with Athena
- Tracking changes with AWS config
- CloudTrail logs are stored in S3. Limit what you log to control costs
CloudTrail event types
-
Management: Configuration changes to AWS services. Reading resources. Logging into the management console. Assuming a role.
-
Data: Access to S3 objects. Lambda function execution
-
CloudTrail: Logs AWS actions. Stores logs in S3
-
CloudWatch Logs: Aggregates logs from CloudTrail and non-AWS sources. Provides interface to view and search logs
Create IAM service role
- Contains inline service policy that grants CloudTrail permissions to send logs to CloudWatch Logs
- Contains trust policy that allows CloudTrail to assume the role
- Role is an IAM principal for CloudTrail to use to authenticate to CloudWatch Logs
Demo


Create a log group in CloudWatch Logs
- Create an IAM role for CloudTrail to assume. The Role will have two permission statements. It can create log streams and it can put the log into CloudWatch Log groups.


- The CloudTrail and the Role have a trusted relationship. If we have a look at the JSON policy. It will allow CloudTrail to assume the Role. The Role will give its permissions to CloudTrail.
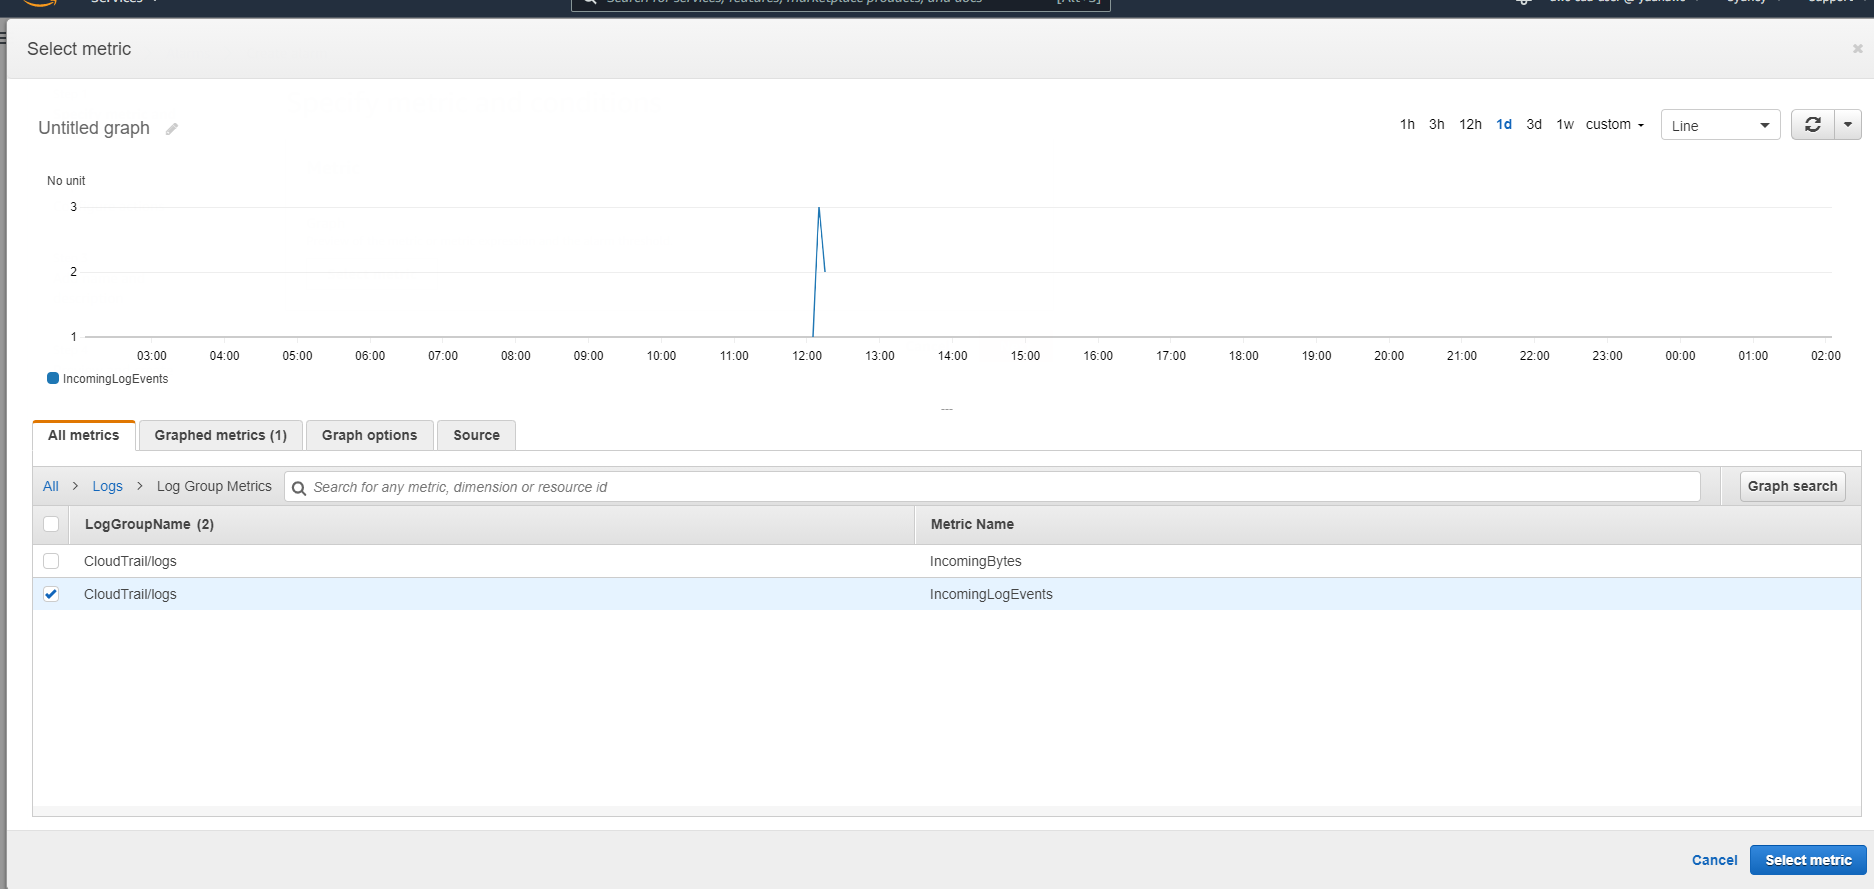
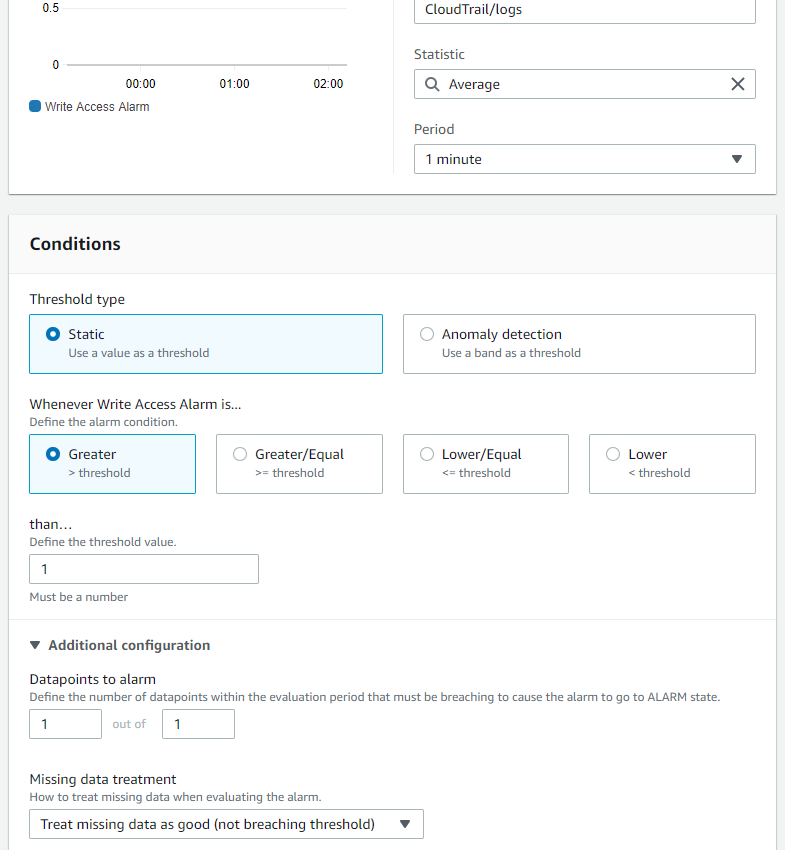
- Create CloudWatch Alarm we need to select a metric, in this case, IncomingLogEvents. We define the alarm so that it triggers the alarm if CloudTrail send more than 1 log to CloudWatch Logs within 1 minute period of time.
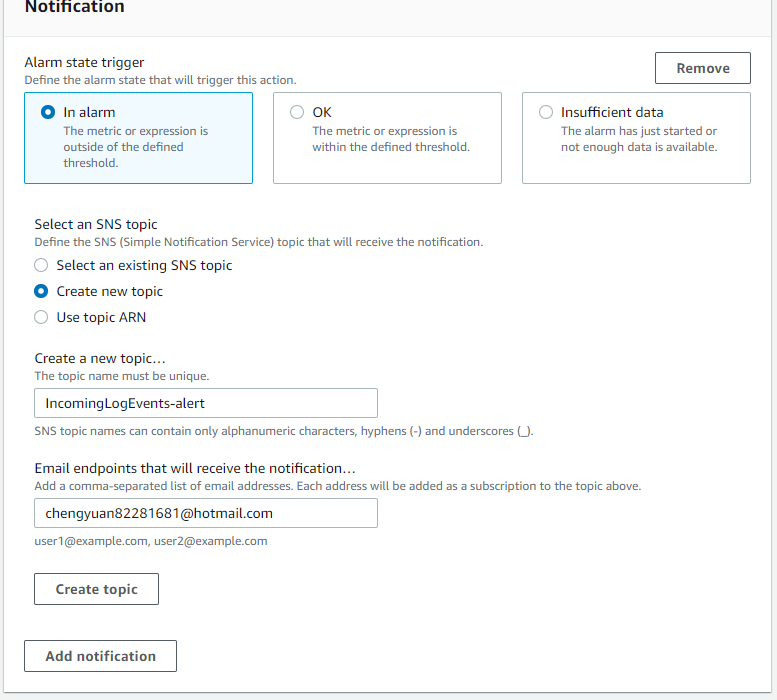
- We also created new topic with an email address so I will get notified if this happens.
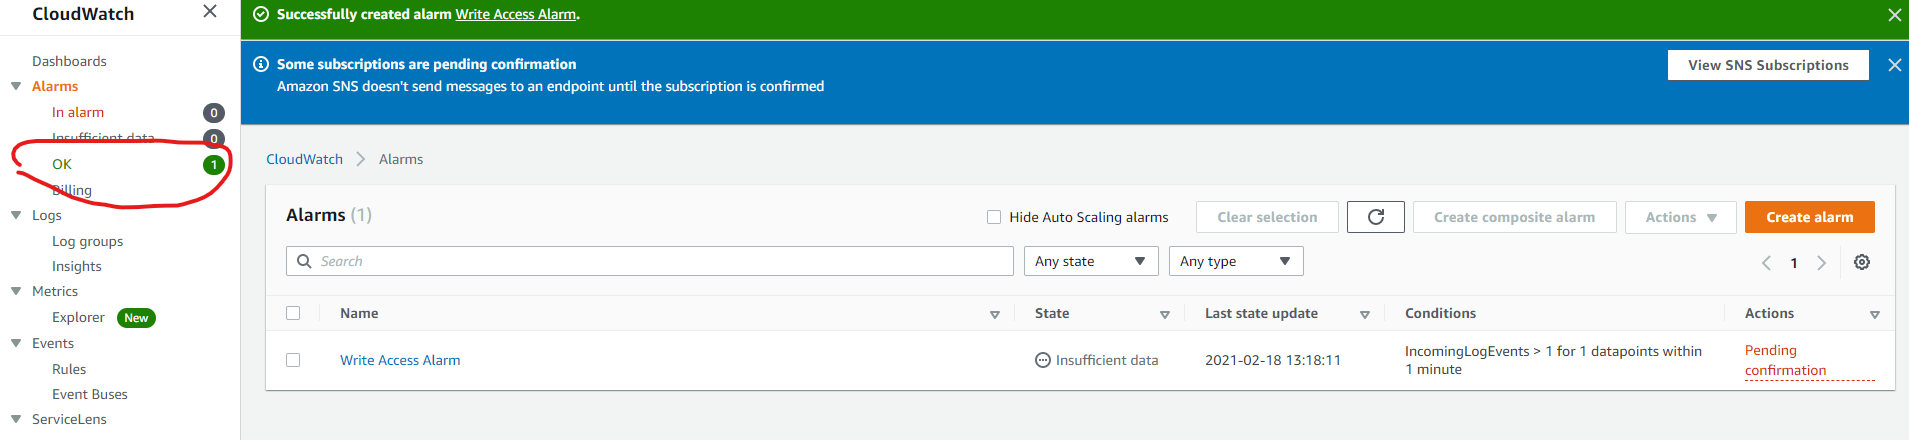
- After the alarm has been created, the status is OK because we didn’t receive any logs in the last 1 minutes. And we treat missing logs as Good.
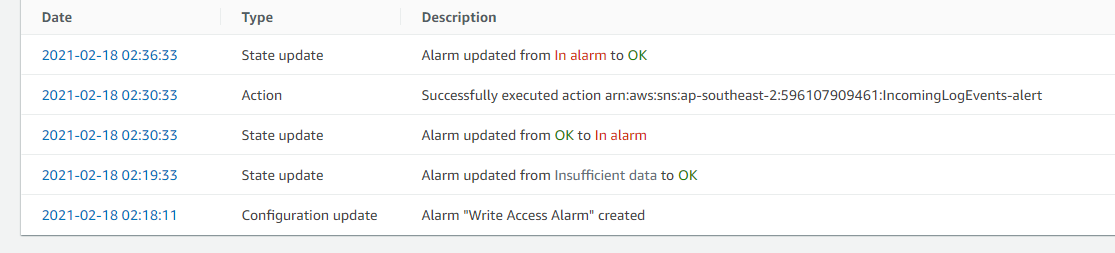
- When there is logs coming in, the status will be changed to In alarm for that 1 minute period and will be changed back to OK the next minute.
- Notice the alarm logs are not in real time. There maybe a couple of minutes delay.
Why Athena?
-
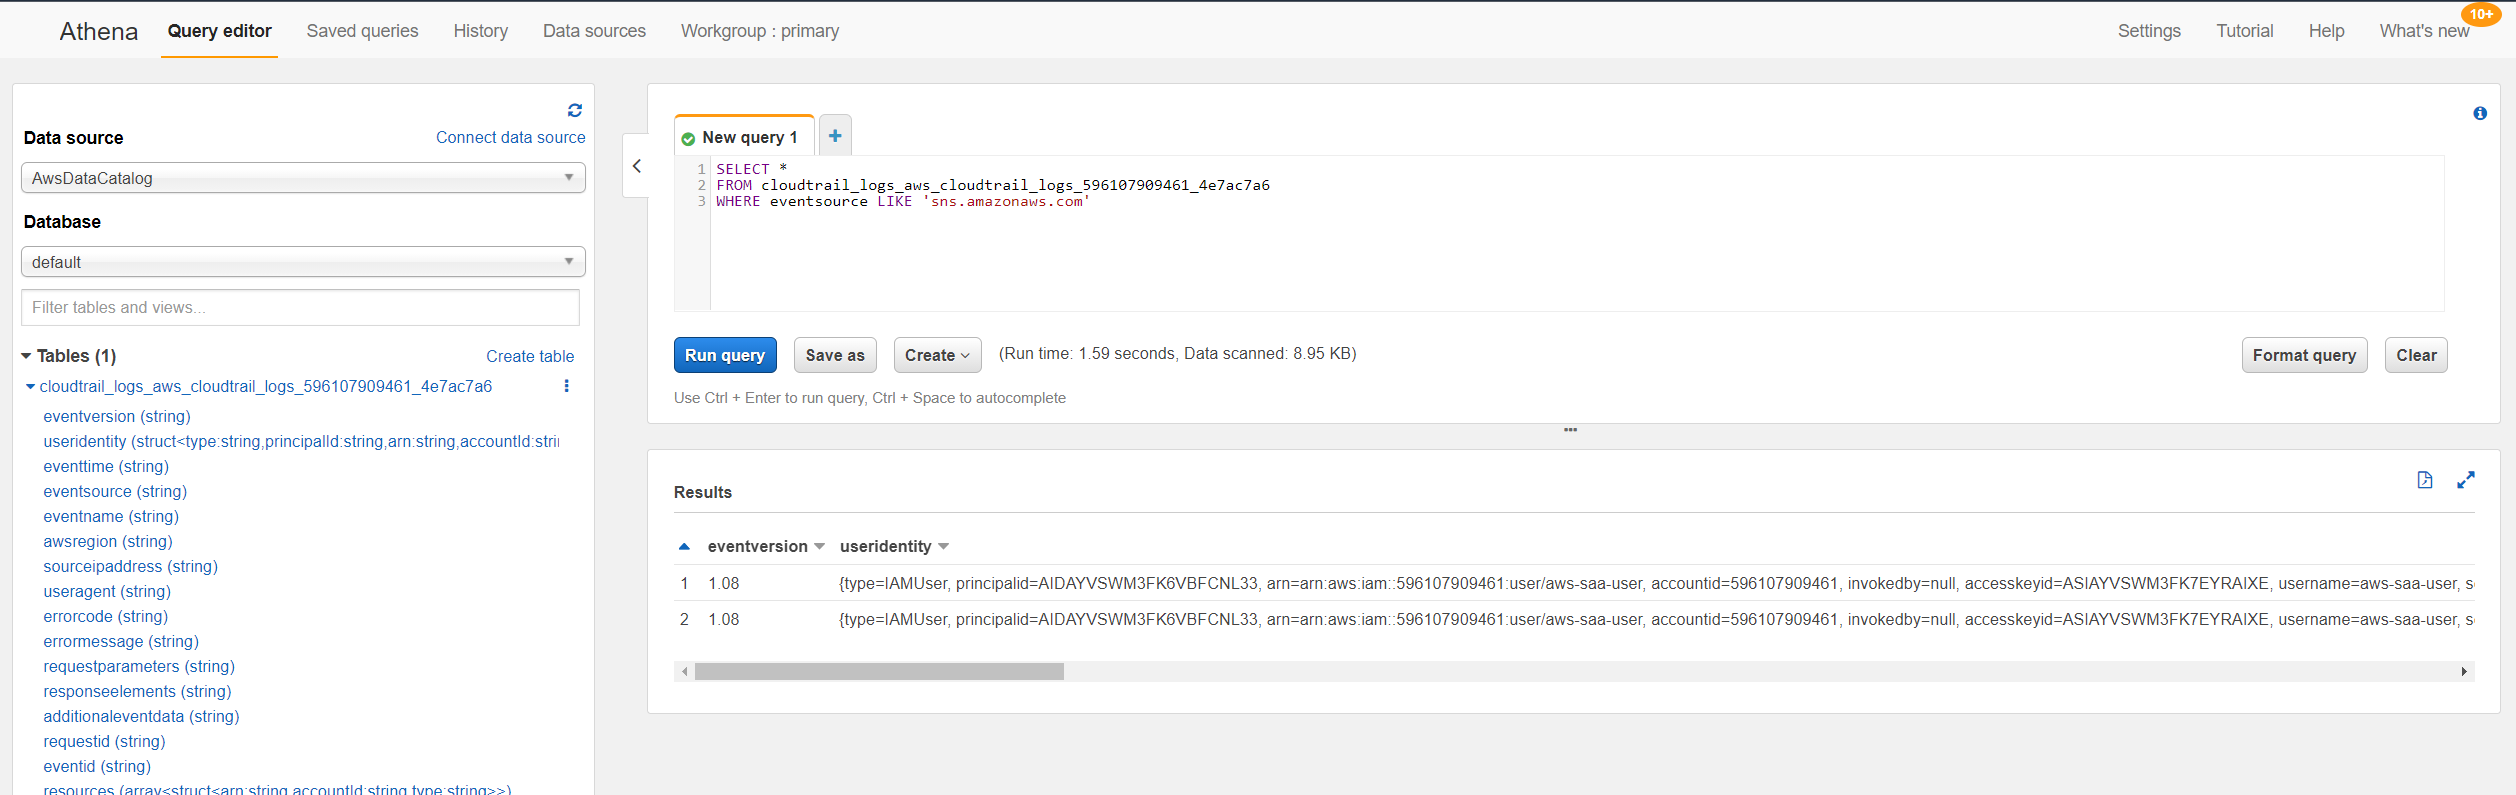
Maybe you don’t want to use CloudWatch Logs. You can use SQL like queries to search thought logs and all S3 objects. If the files are in correct format (e.g. csv, JSON, CloudTrail logs stored in S3 are in JSON format)
-
Athena usrs SQL, so to search files in s3, we need to provide the schema. AWS provides the schema for CloudTrail Logs
Demo

- Note you need to create a save location for the Athena search result in S3 before run the query.
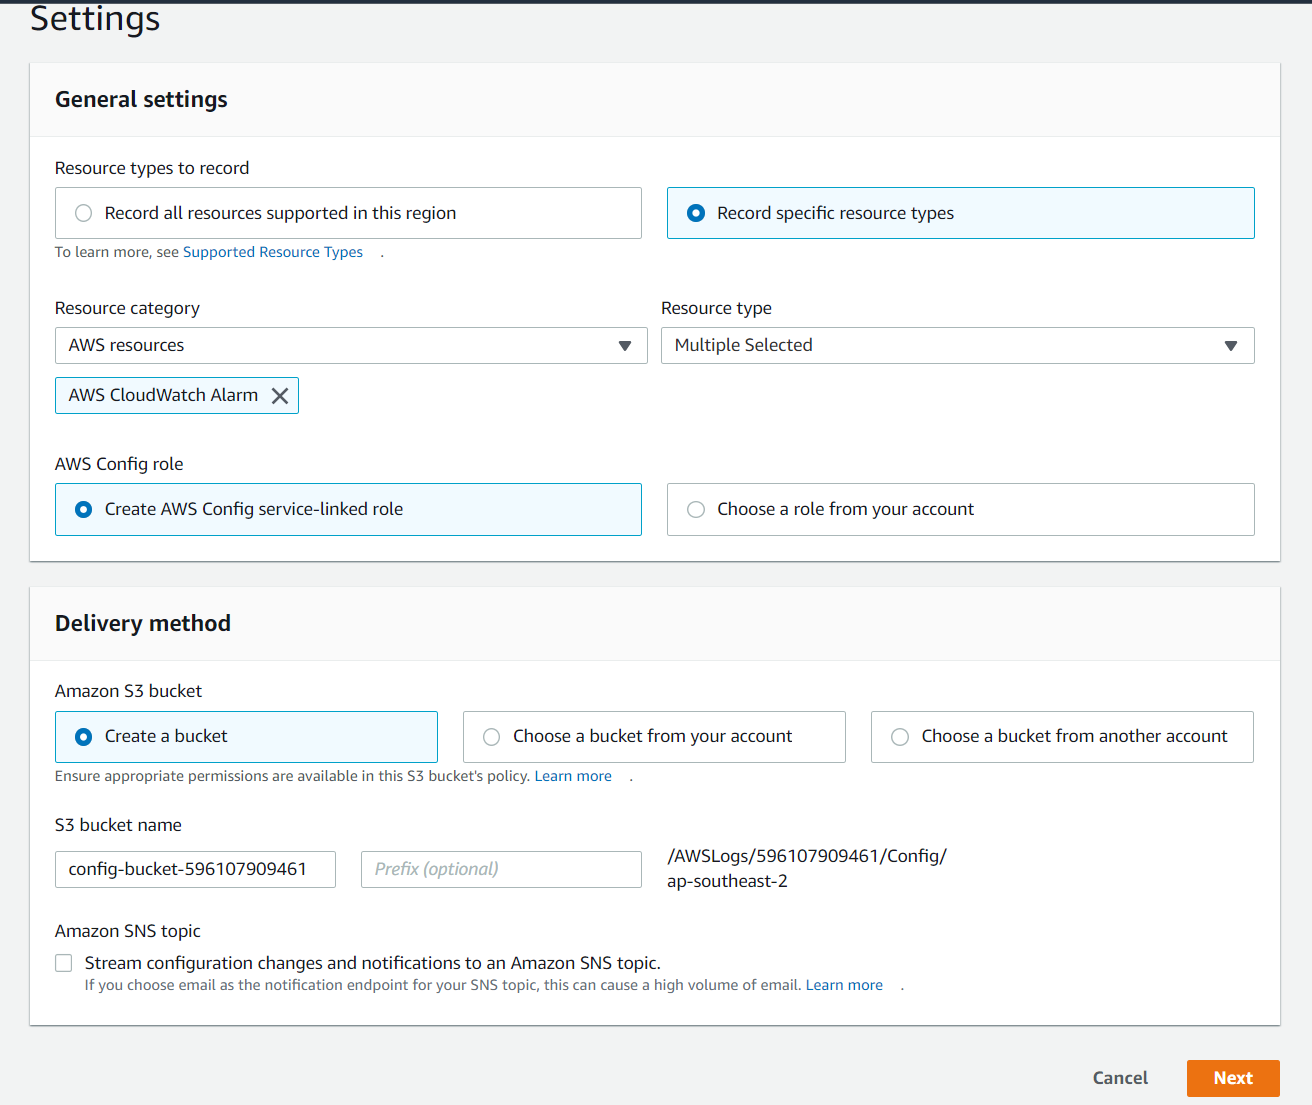
Tracking Configuration Changes in AWS Config
- Tracks configuration changes over time.
- AWS config can tell you the stats of all AWS services of any point of time in the past.
- Records changes in S3.
- Notifies of changes
Summary
- CouldTrail tracks events
- ClousdWatch Logs aggregates logs from different sources
- CloudWatch Alarms trigger based on specific log activity
- Athena performs SQL queries against objects in S3
- AWS Config tracks configuration states over time
Part Three: Protecting Network and Host-level Boundaries
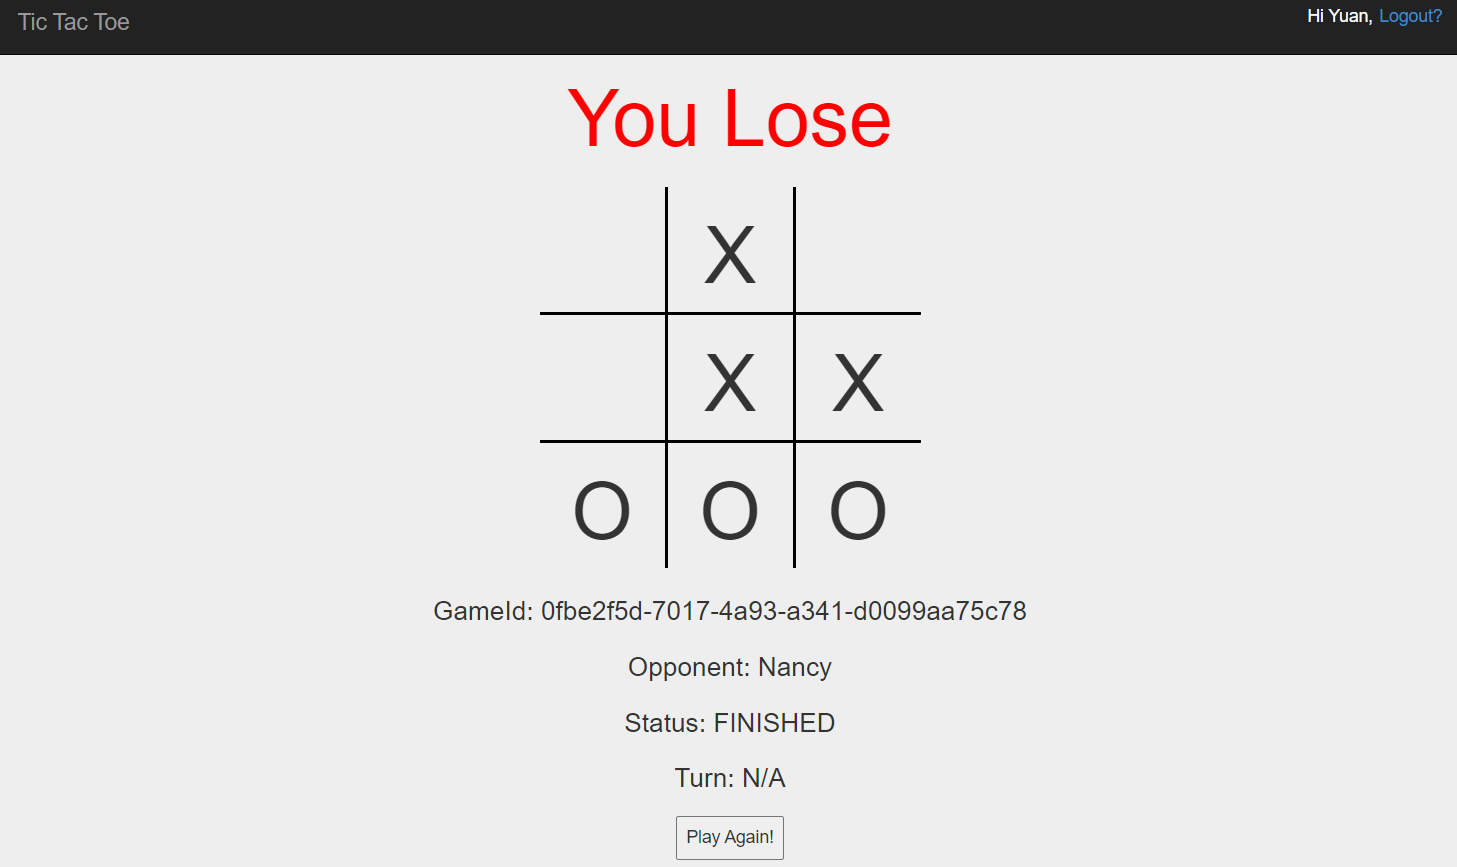
Tic-tac-toe web application
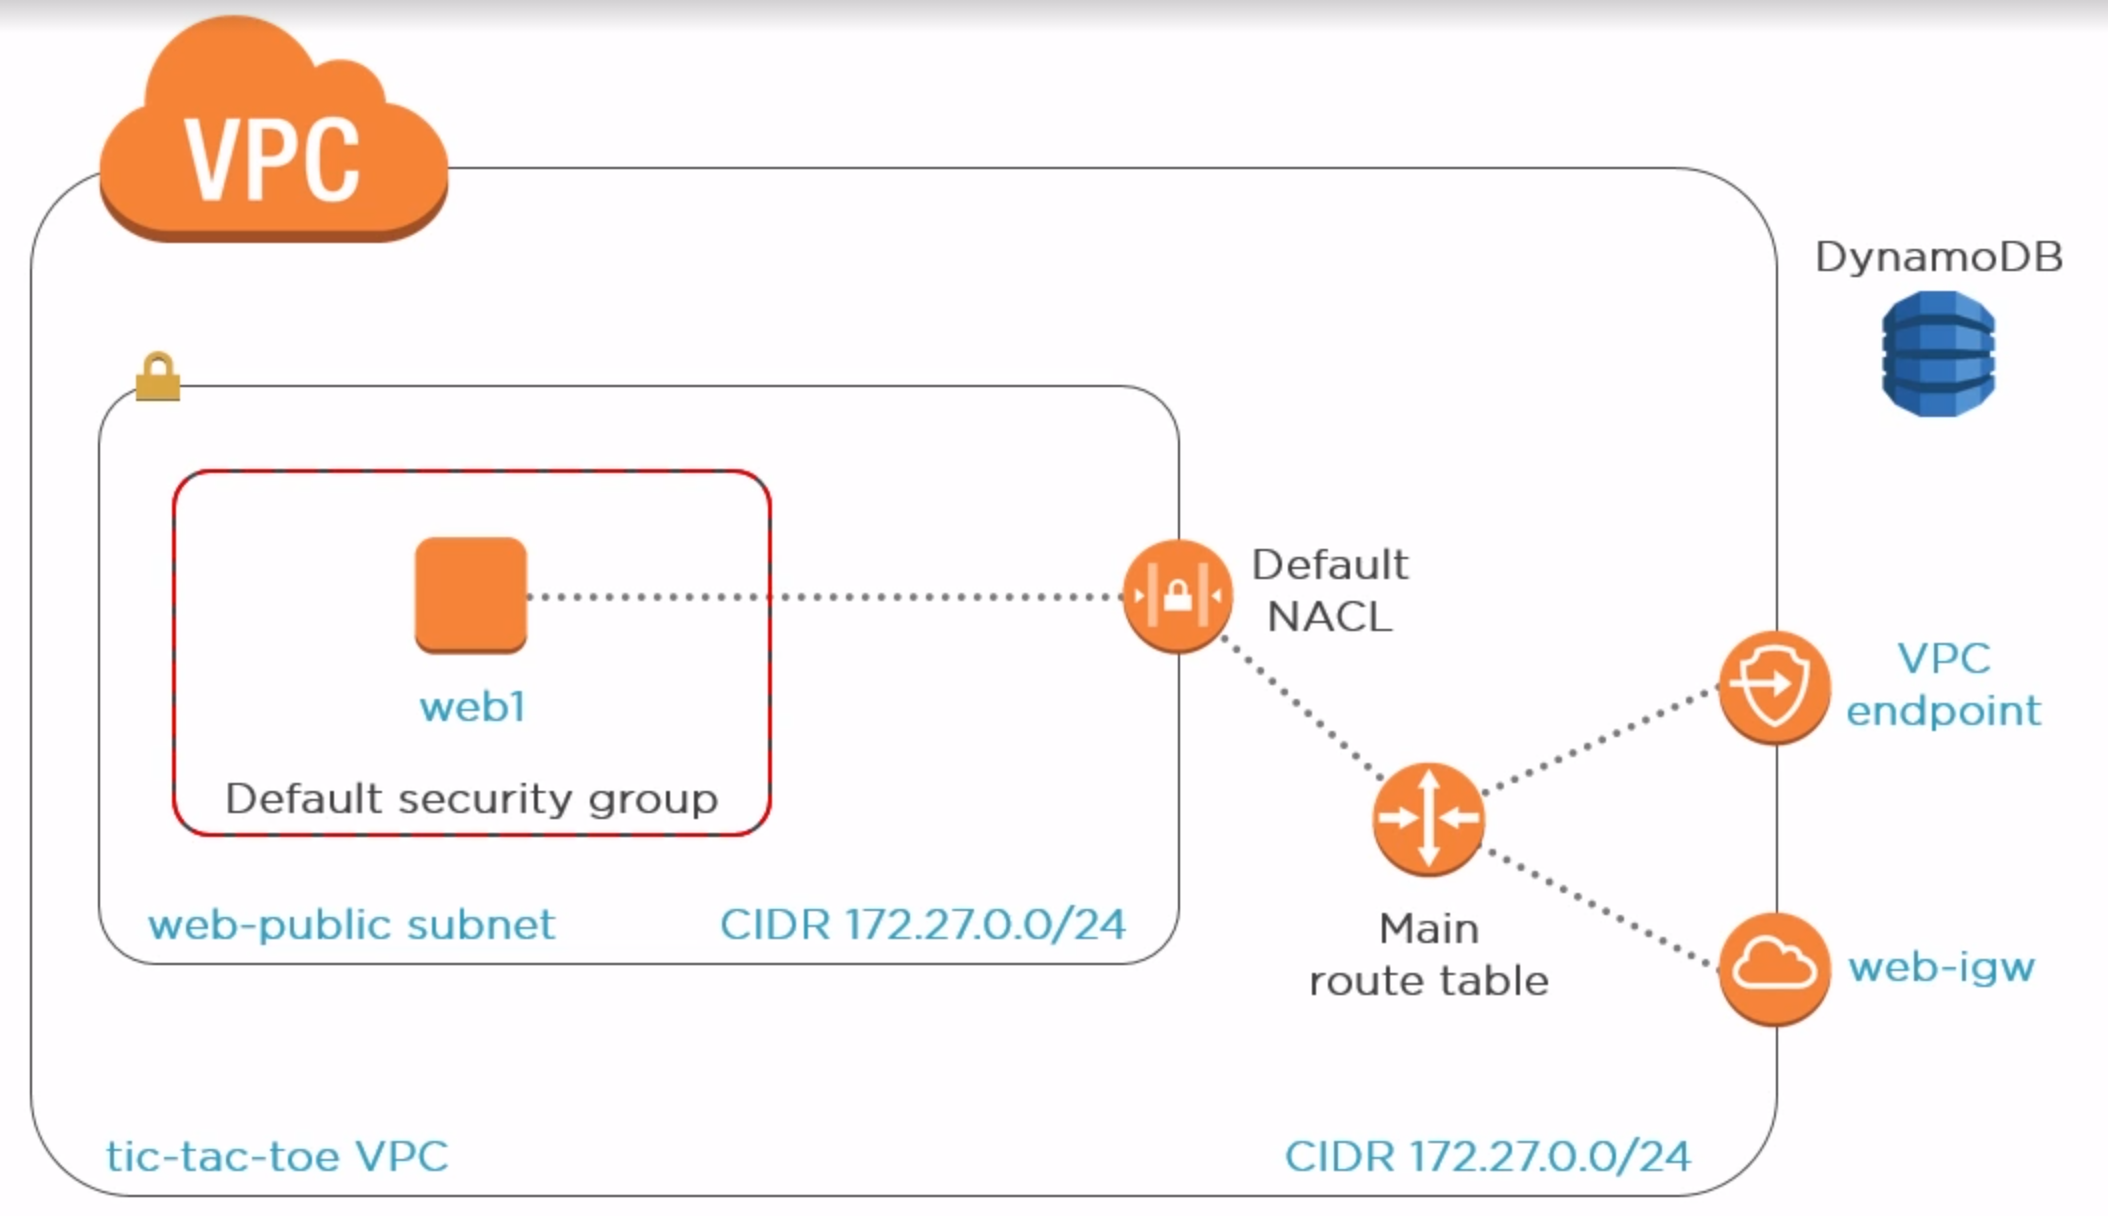
- Host-level boundary is the default security group between the public subnet and the EC2 instance(auto created).
- NACL(netwoek access control list): controls traffic in and out the subnet
- having both the security group and NACL gives you layers of security around your instance.
- The game data stored in DynamoDB, to communicate with it, we have two options
- We can go over the public internet via igw(internet gateway)
- We can also use a VPC endpoint, which is a non-internet private connection
Module Overview
- Creating a public subnet
- Creating and using an IAM instance profile
- Using SSH key pairs
- Using VPC endpoints
- Network access control lists
Demo
- Create VPC
- Create subnet
- Create igw
- Attach igw to VPC
- Add routes in VPC’s main route table
- Add VPC’s inbound rules
- Create IAM role to allow access to DynamoDB
- Role will contain a trust policy to allow EC2 instances to assume the role
- Launch instance and attach instance profile
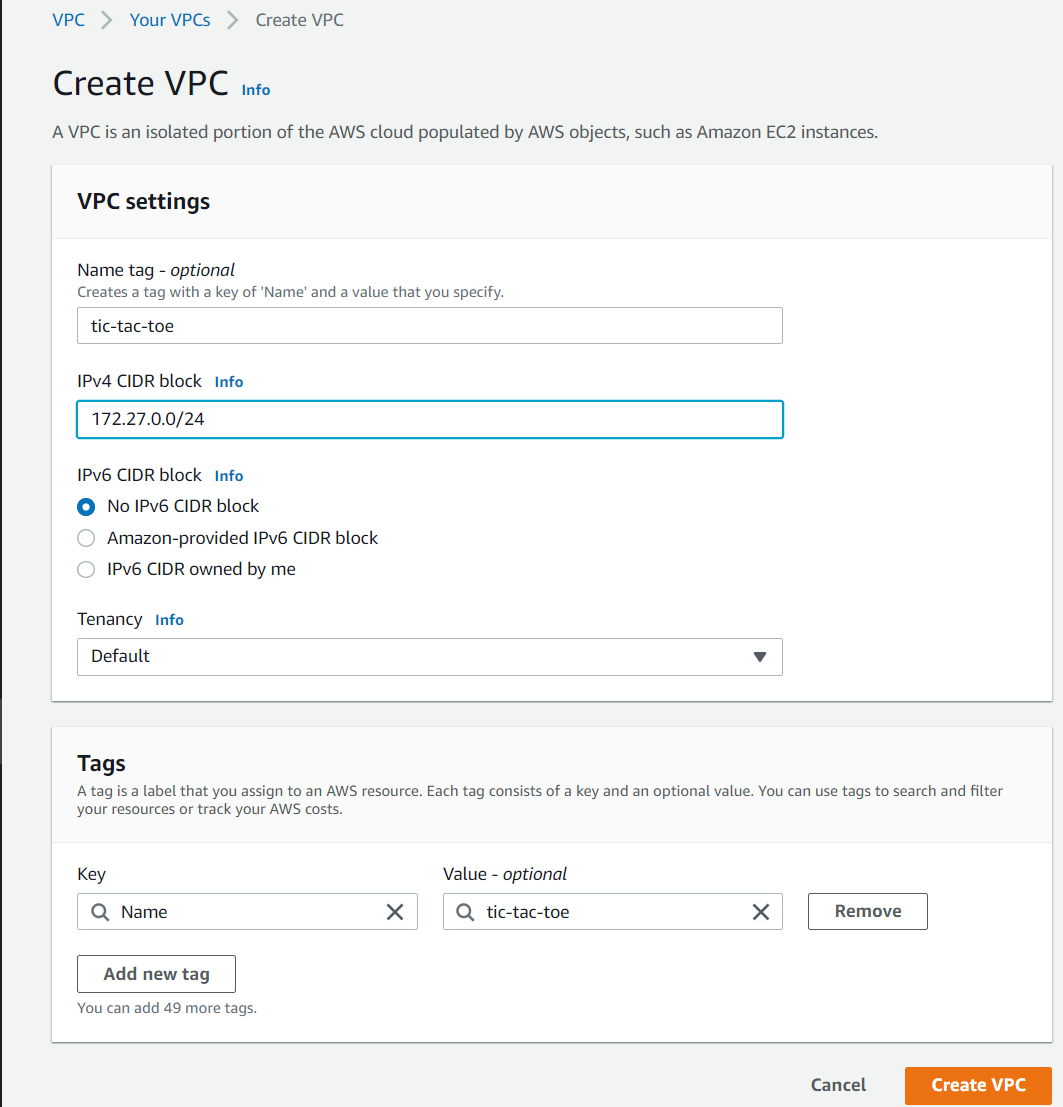
- Create VPC
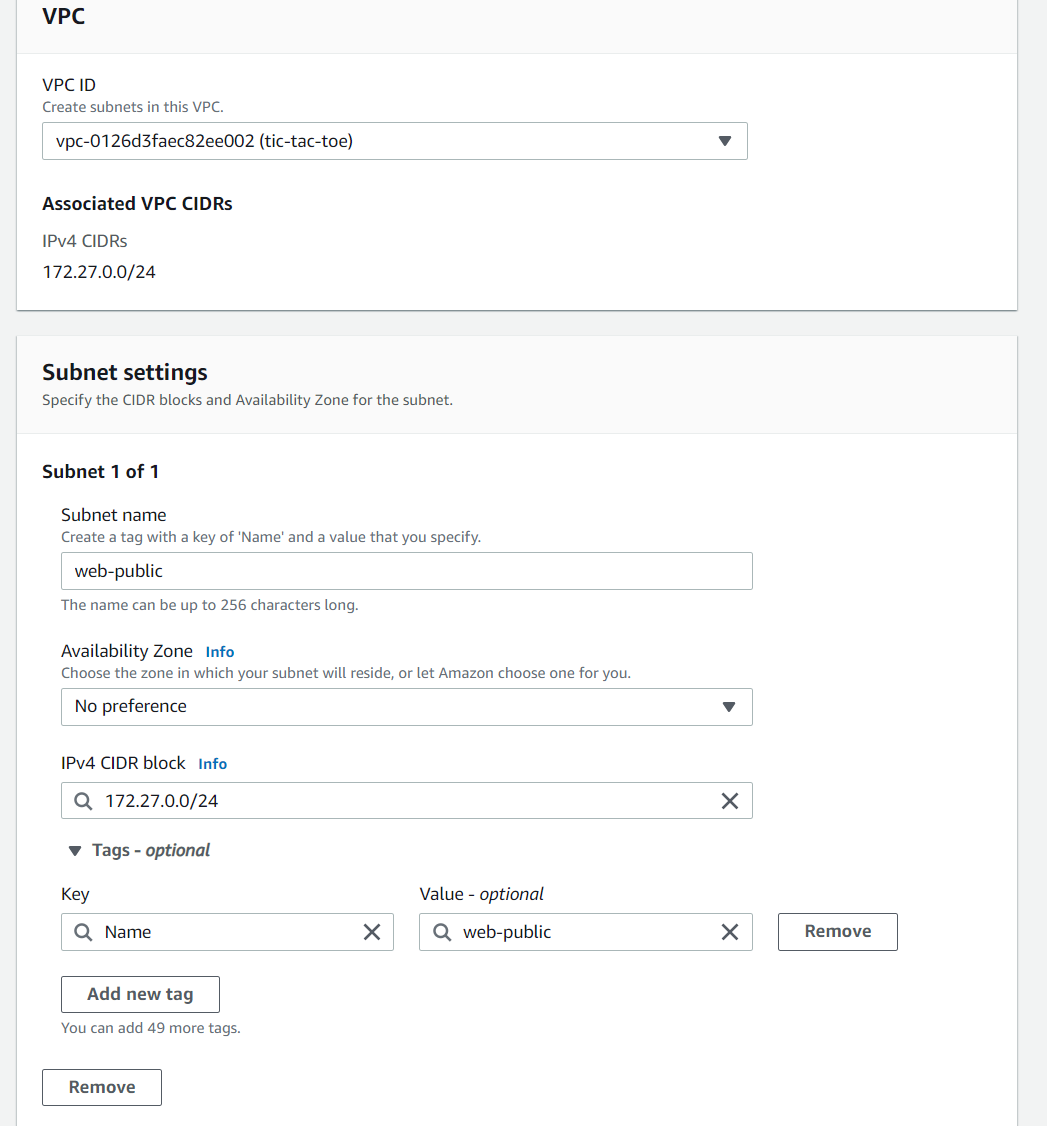
- Create public subnet, we use the CIDR block the same as our VPC because we are only going to create one subnet for this VPC
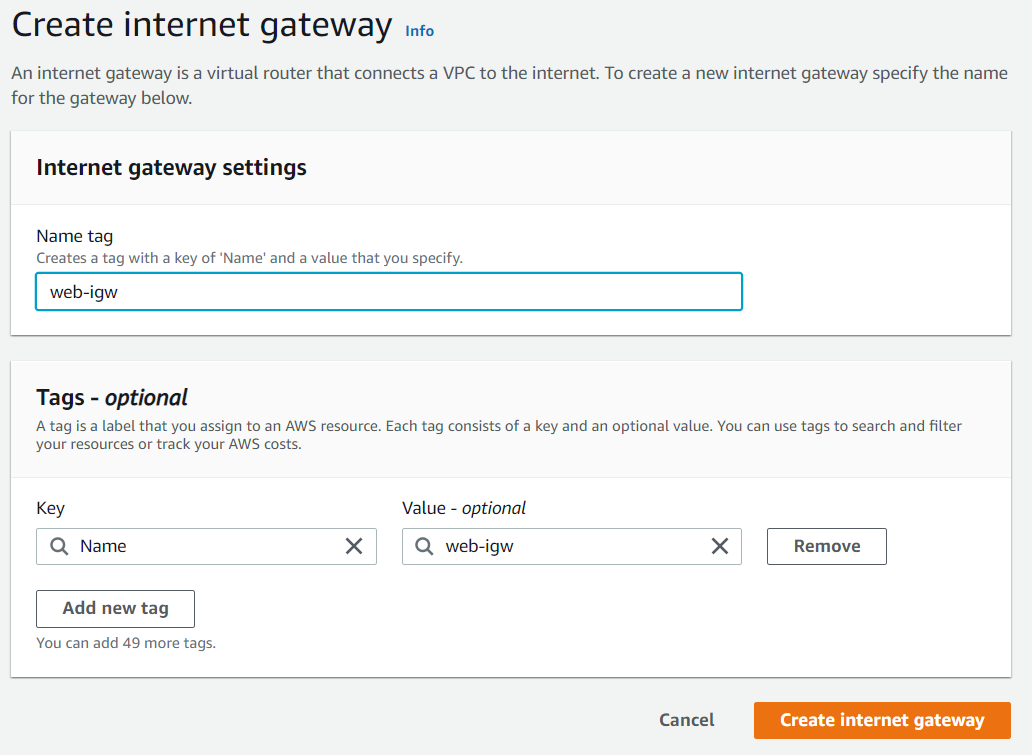
- Create internet gateway
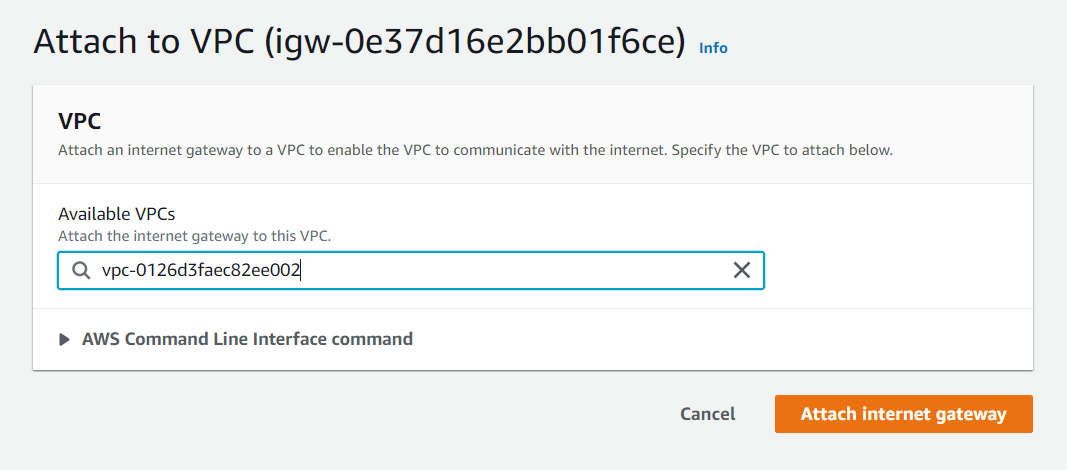
- Attach internet gateway to VPC
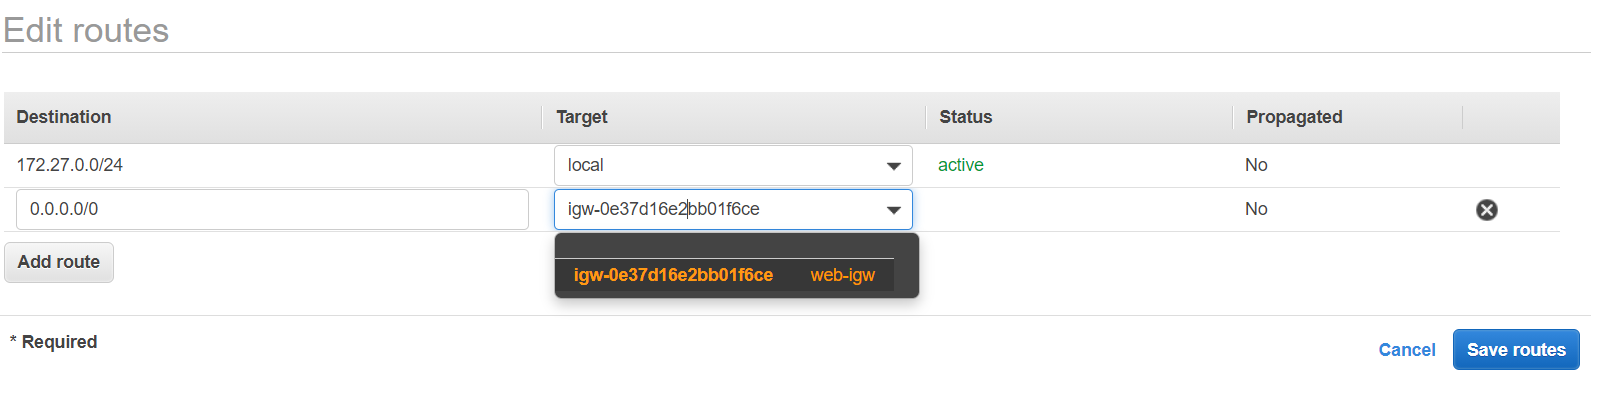
- Edit the main route table, add another record. Route all traffic to igw. By doing this we make our subnet a public subnet
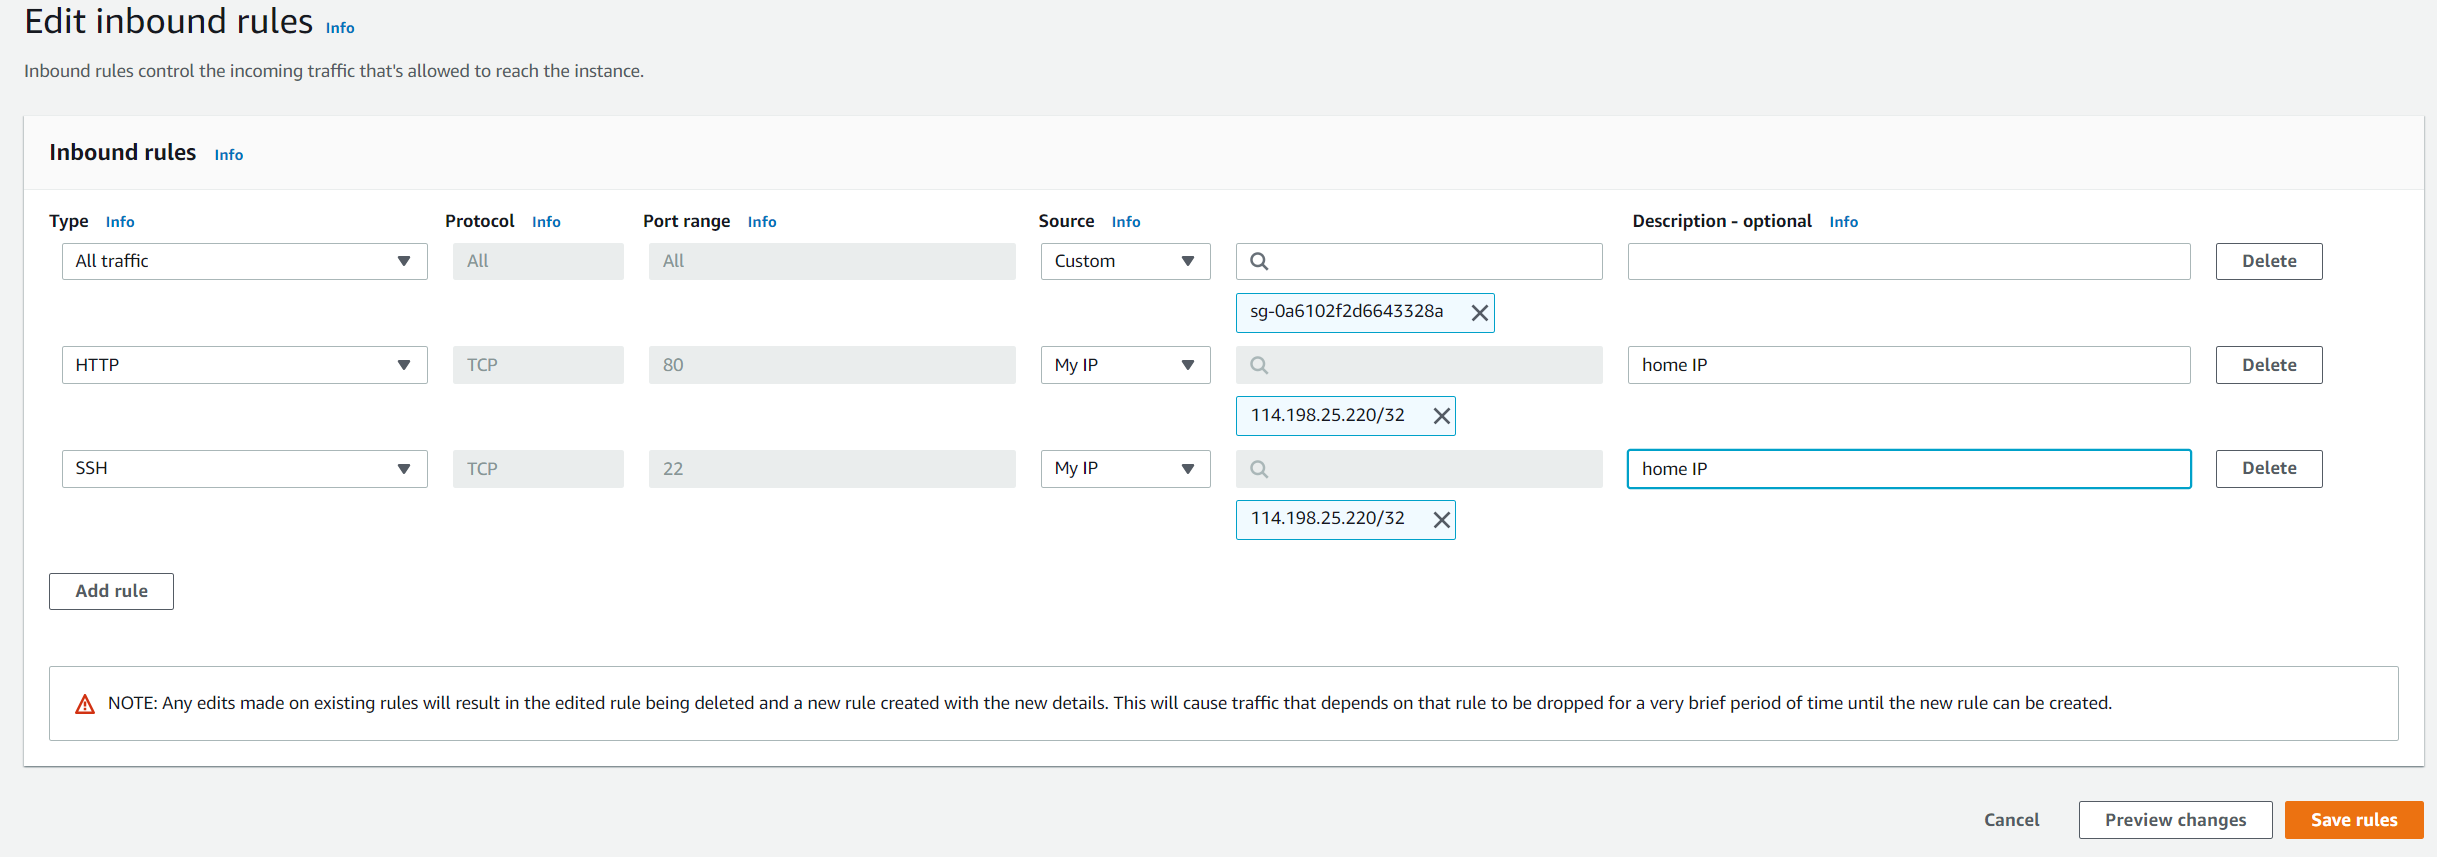
- Add two inbound rules in our VPC’s default security group. Use my home IP as source. So only at my home can I access the VPC services by HTTP or SSH.
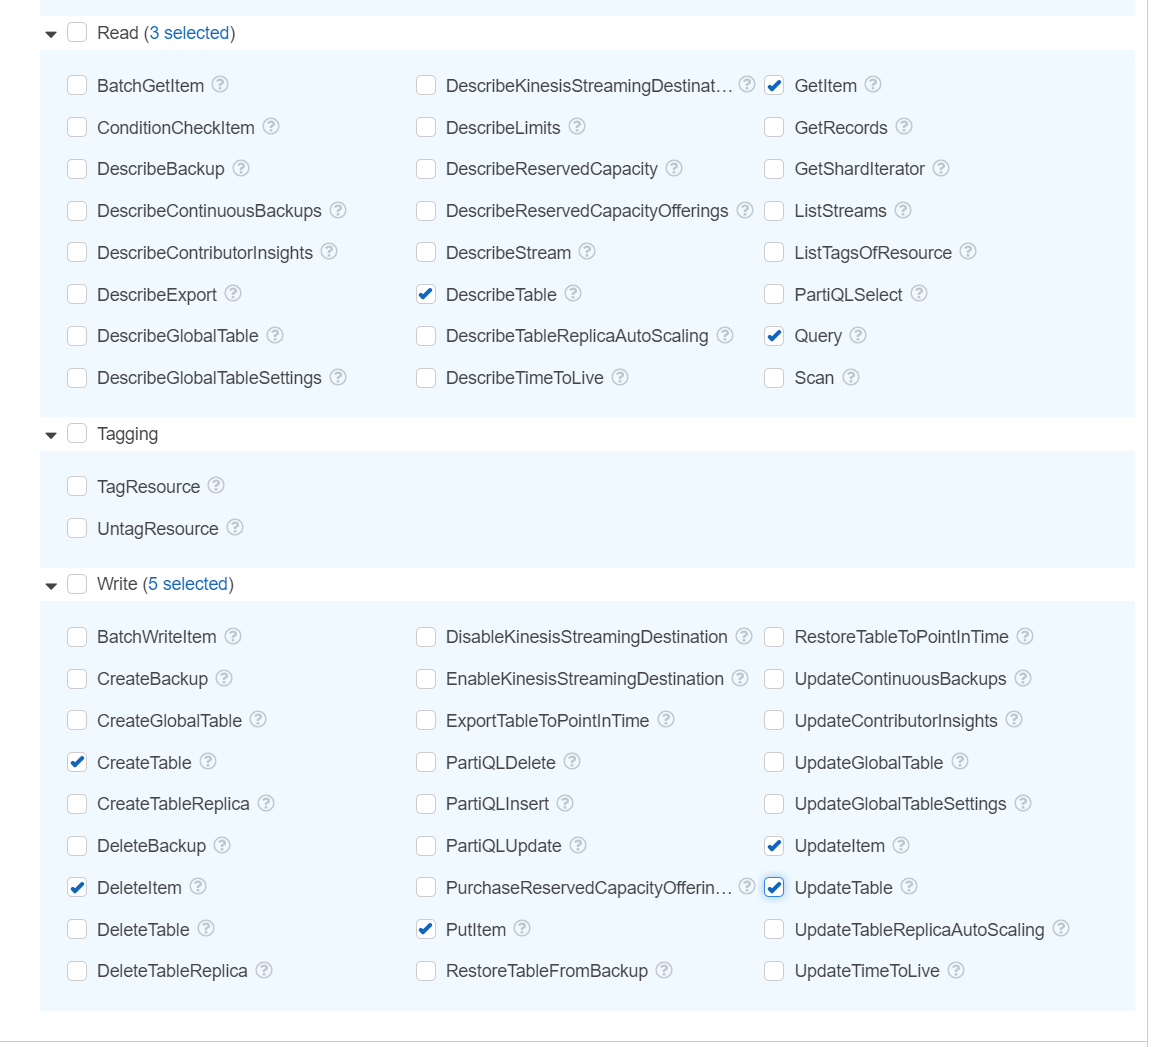
- Create IAM role to access DynamoDB
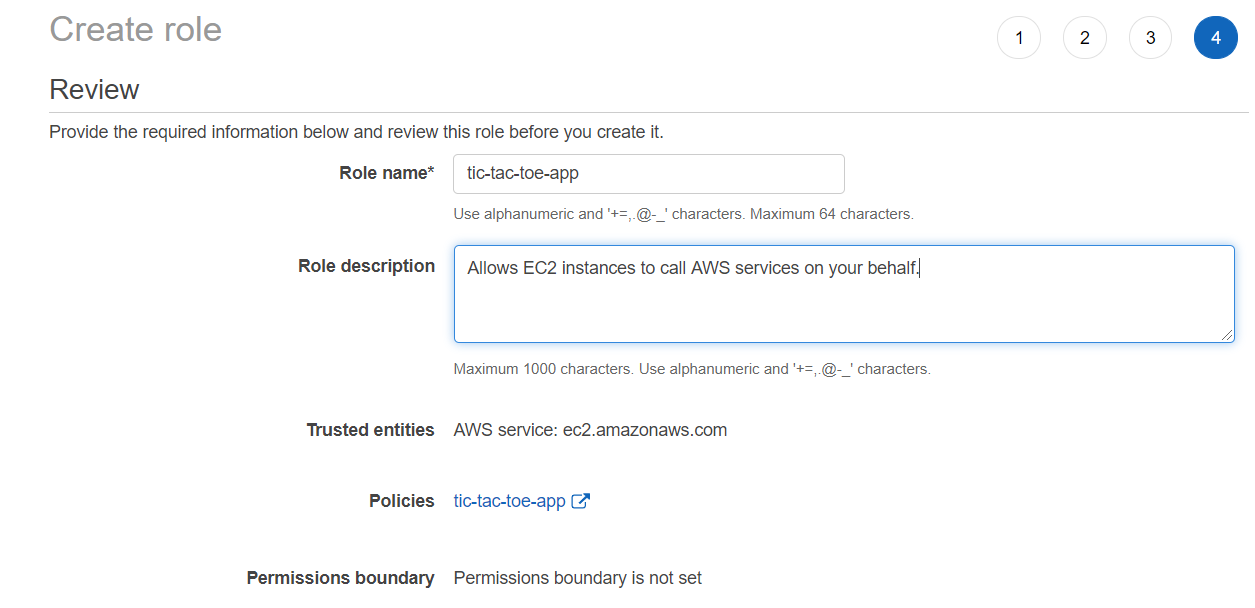
- Create a role and attach the policy to it. Because we choose EC2 as the service that will be using this role, the trusted entity is EC2. It also creates an instance profile for us.
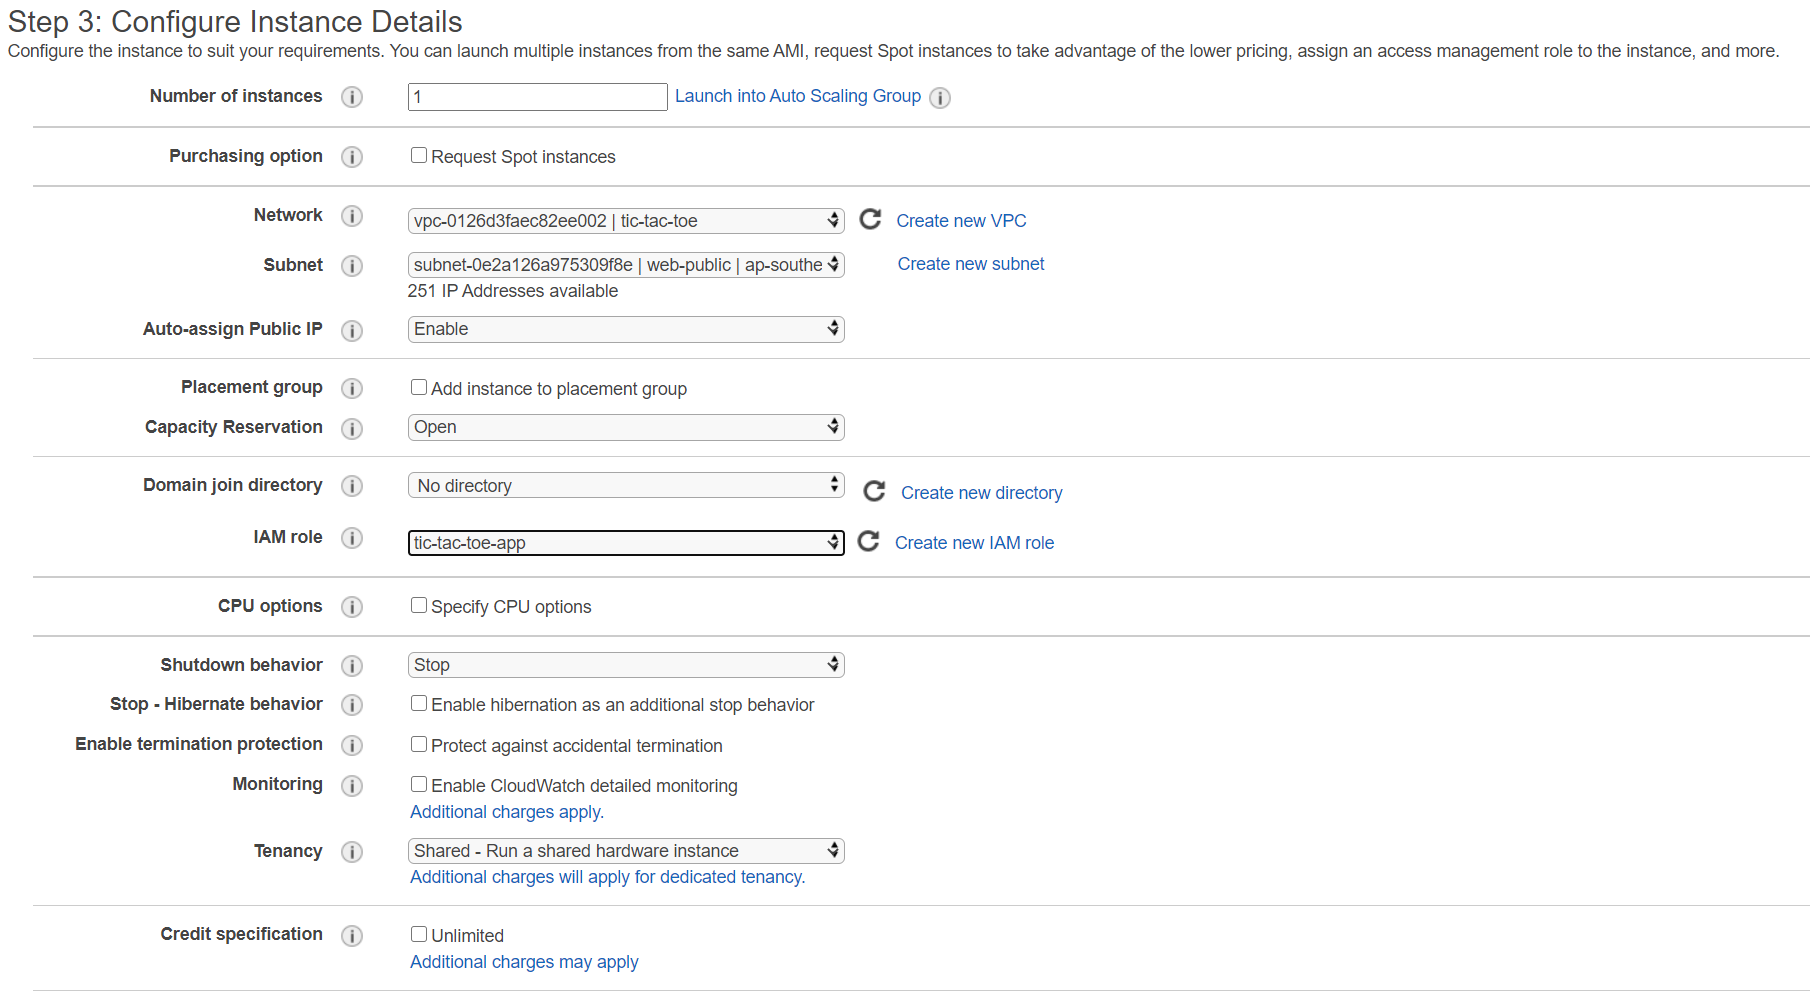
- Create an EC2 instance
1 | ssh ec2-user@13.55.117.52 -i .\hellcyAWSkey.pem |
- Access EC2 instance via SSH
- You need to go to your private key location (pem) and change the access level to 400(linux) or change the Owner to yourself and remove all other groups and users. Check here
1 | sudo yum -y install git python2-pip.noarch |
- install the app
1 | git clone https://github.com/benpiper/dynamodb-tictactoe-example-app |
- clone the repo from github
1 | sudo pip install flask boto |
- install dependecies
1 | sudo python application.py |
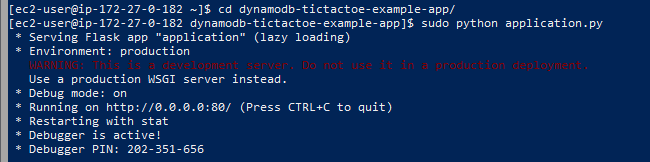
- cd to the application folder and run the app.
- You can play the game with other people who logs in
1 | curl 169.254.169.254/latest/meta-data/iam/security-credentials/tic-tac-toe-app |
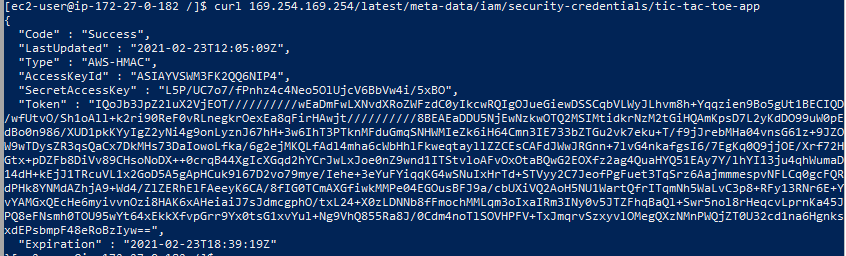
- this is the secret token generated by AWS STS(Security Token Service) using instance profile(from the role) to allow our instance to access DynamoDB.
Using VPC Endpoints
- Now we are going to change our traffic to go through a private link via VPC endpoint.
Demo
- Block outbound internet access from the instance
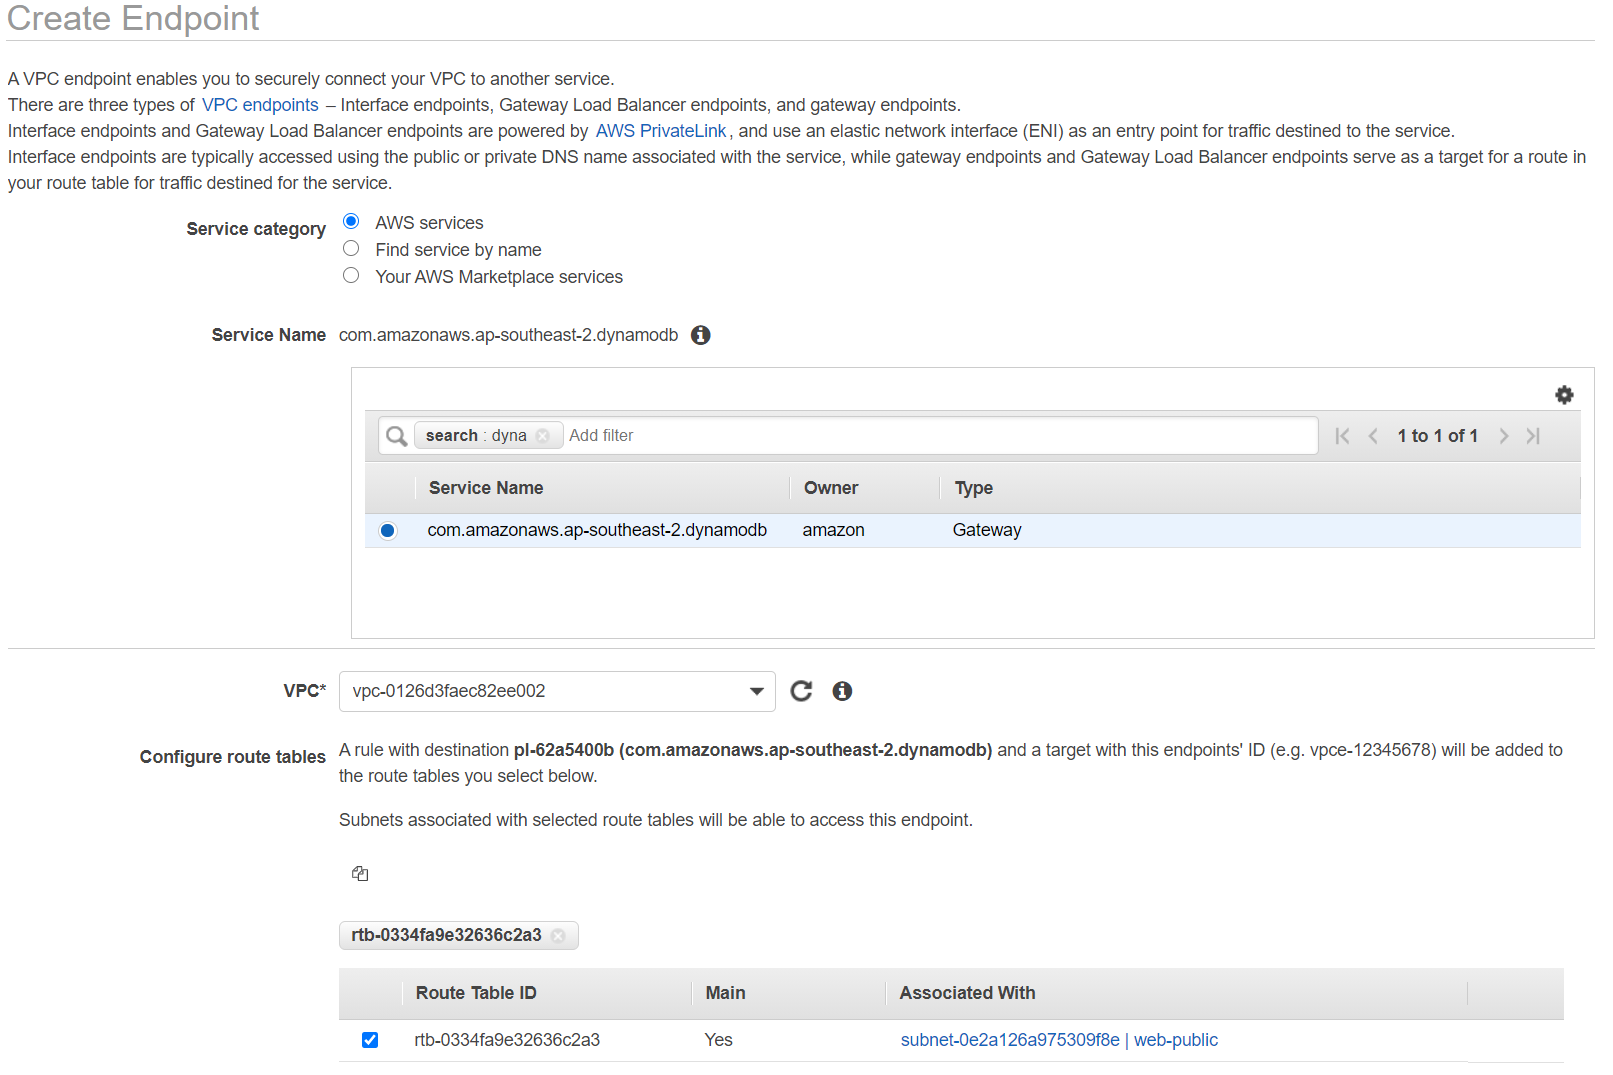
- Configure VPC endpoint
1 | nslookup dynamodb.ap-southeast-2.amazonaws.com |
- look up the ip address of DynamoDB at our current AWS region
1 | sudo netstat -tp | grep python |
- check outbound connection from our EC2 instance to DynamoDB. Note our application needs to be running for this to work.

Create VPC Endpoint
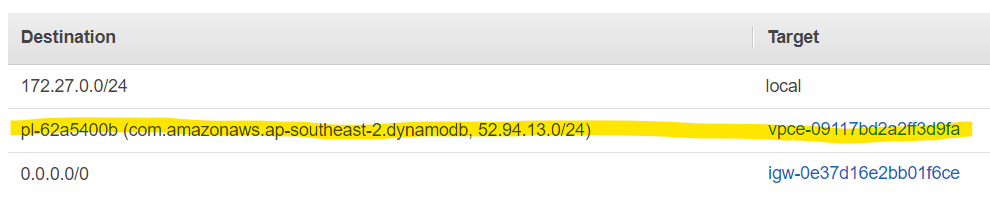
- New route rules will be added to the route table. This is to change the traffic sent to the DynamoDB from the private VPC endpint instead of the public igw
- Note it is required to create a policy for this VPC endpoint. The policy controls what the requests can do to the DynamoDB. Remember we already created a policy for a role and attached that role to our EC2 instance. They are two different policies. One for EC2, One for VPC endpoint.
-
in the VPC’s security group. We need to remove the outbound rule for accessing public internet. Add a new rule to access DynamoDB endpoint.
-
Note that we can access to the EC2 instance because we still have the inbound rules.
-
Security Groups are stateful. They track the state of the connections to and from your instance. If you allow the traffic into your instance, then the security group will automatically allow the instance to reply to that traffic.
-
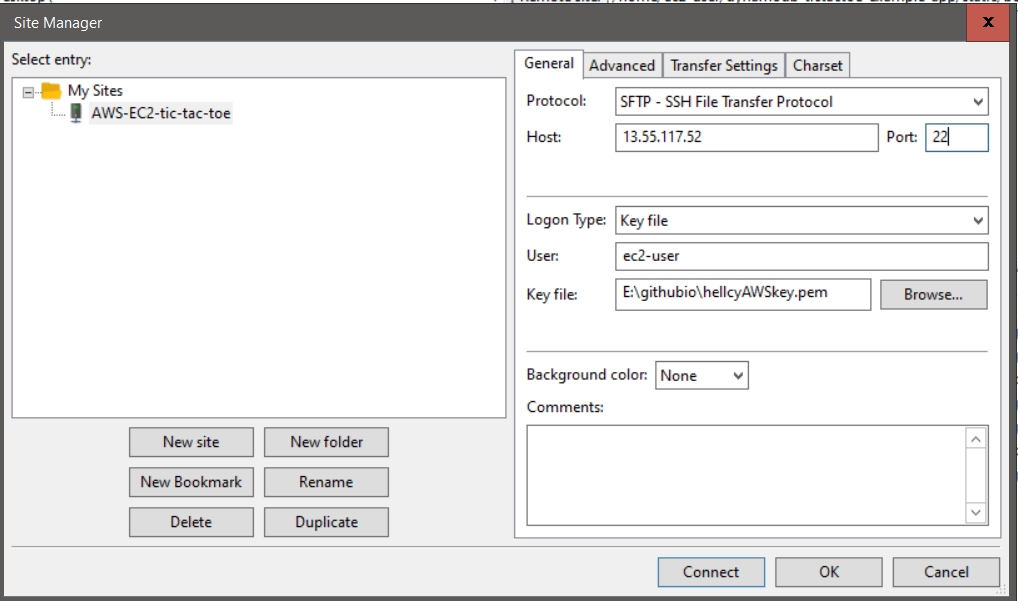
Note there is a file bootstrap-responsive.css missing in the course app. I used FlieZilla uploaded this file to EC2. Below is the FlieZilla connection settings. Note port is 22.
Network Access Control Lists
- Security Group controls in/out traffic for a EC2 instance. While NACL controls all traffic in the subnet. They are two layers of security.
Differences between Security Group and NACL
- Security Group
- Instance Level
- Stateful
- Unnumbered rules (rules don’t have order)
- NACL
- Subnet level
- Stateless
- Numbered rules (rules have order)
-
Stateful means security groups will automatically allow reply traffic.
-
Stateless means if you only have inbound rule to access the instance. But do not have the outbound rule. Then the traffic can not leave the subnet. You have to setup both in/out rules to access an instance in the subnet.
-
Numbered rules means each rule will have a number. Smaller number rules will be applied first(high priority).
Summary
- A public subnet has a default route to an internet gateway
- Use an IAM instance profile to grant an instance access to an AWS service
- Decide whether to connect to AWS endpoints via the internet or a VPC endpoint
- Security groups and network access control lists act as firewalls but differ in significant ways
Part Four: Protecting Data at Rest
- Data at Rest is the data stored in a place(hard drive)
- Data in Transit is the data being sent in public internet
- Access Permissions
- Bucket policies
- User policies
- Access Control lists
- Encryption
- Requires access to a key to encrypt and decrypt data
- if the key is gone. so is the data!
Module Overview
- Create a customer master key(CMK)
- Encrypt an EBS volumn
- S3 access control lists, bucket policies, and user policies
- Securely grant anonymous access to S3 object
- Encrypt S3 object
Demo Create a customer master key using KMS
- Assign a key alias(friendly name)
- Define key administrators (people who manages the key)
- Define key users (people who will be using the key)
Demo Encrypt the data on an unencrypted EBS volume
- Stop the web1 instance (tic-tac-toe)
- Take a snapshot of the root volume
- Make an encrypted copy of the snapshot
- Create an AMI(instance image) using the encrypted snapshot
- Launch another instance using the new AMI
Demo S3 Access Permissions
- Create an S3 bucket
- Configure bucket access control lists
- Create a bucket policy
- There are two types of policies
- identity based policy
- we set this up in IAM, we can grant policy to a IAM user
- resource based policy
- we set this up in resource page. We can add IAM users to the policy to let the resource know that these people can access it.
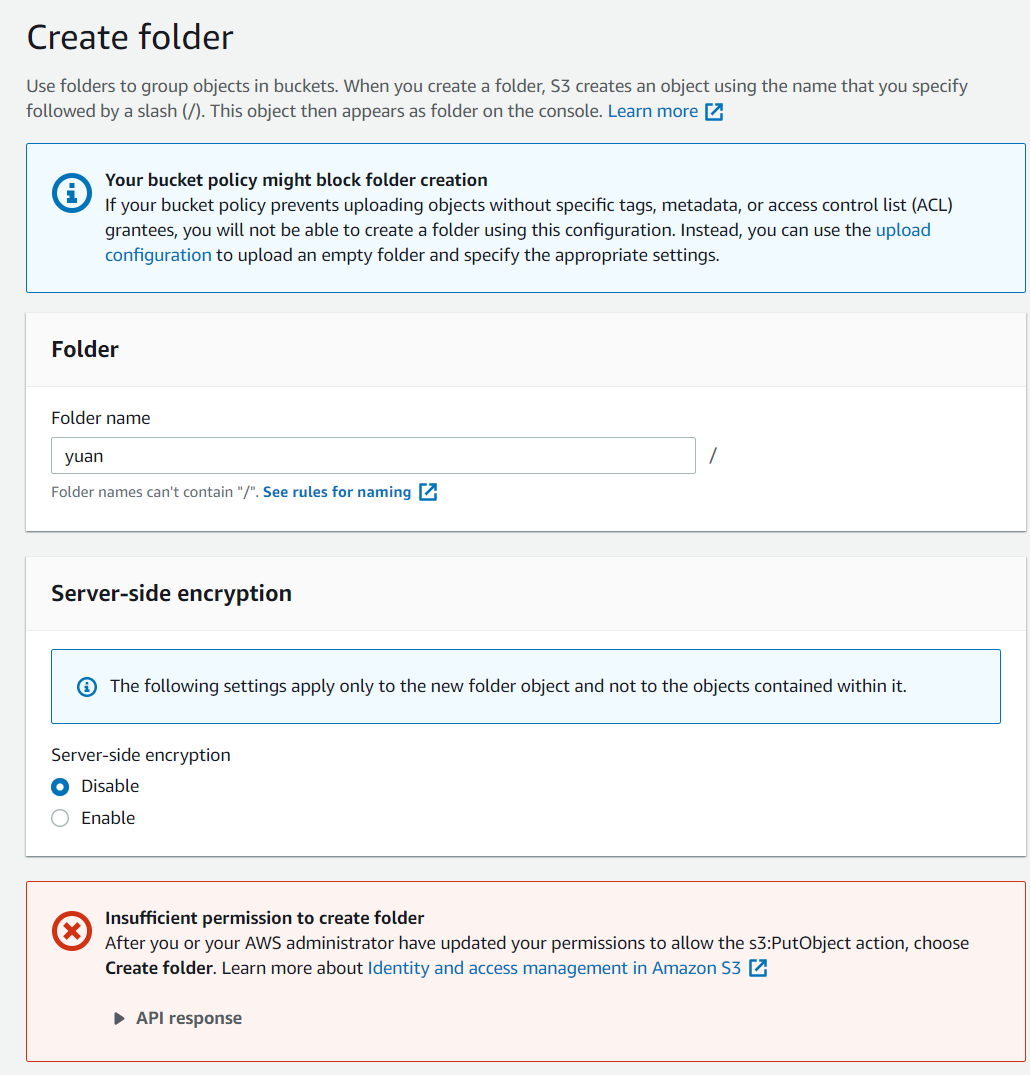
- Create a folder in the new S3 bucket and try to access this folder using another IAM user who only has read access to S3 buckets. Then try to use the new user to create another folder in S3 (will fail).
- Note folder in S3 is just another object(just look like a folder). So it requires the same permission as objects.
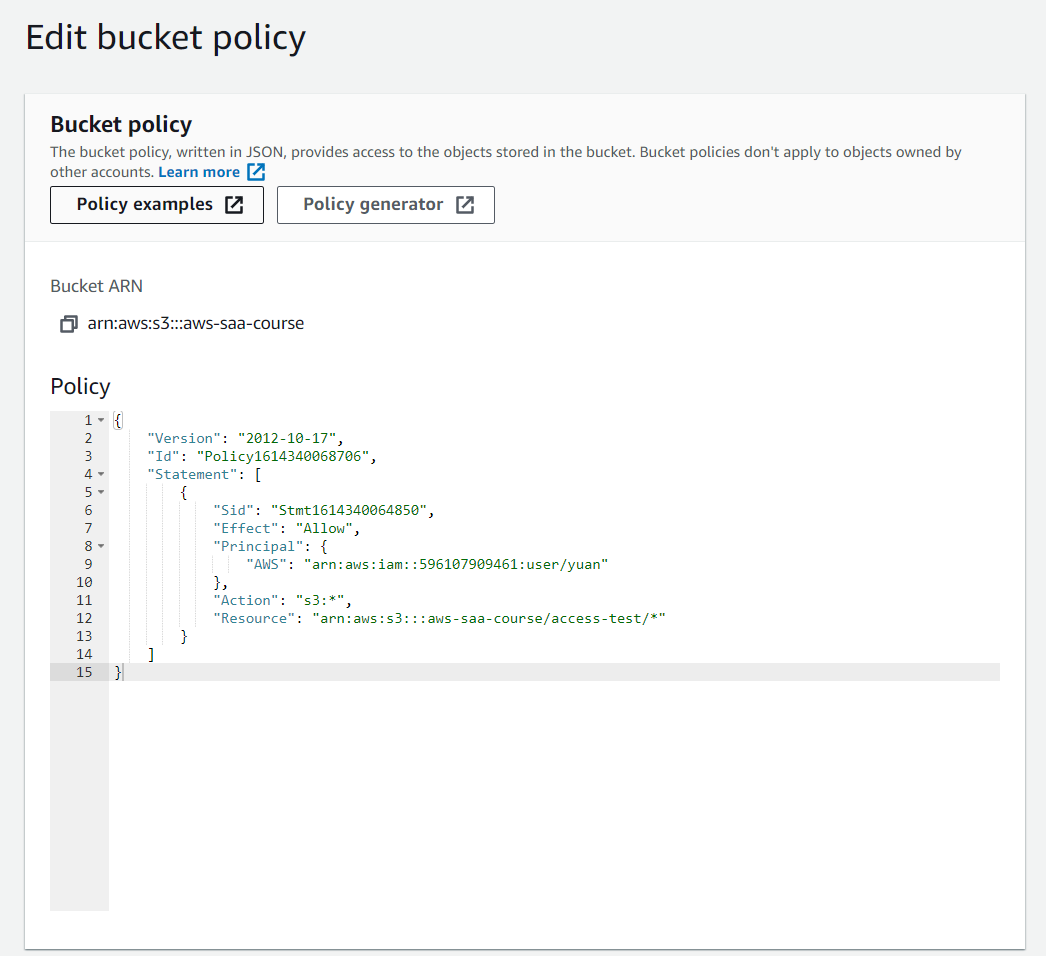
- using Bucket inline policy generator, we can add another IAM user to the access list in S3 policy. Need to specify the IAM user ARN and S3 bucket ARN. After doing this we can create another folder using another IAM user.
Demo CloudFront Origin Access Identity
- Create an S3 bucket
- Create an origin access identity(OAI)
- Grant OAI access to the bucket
- Create a CloudFront distribution
- Note to grant OAI access to the S3 bucket, we need to create an inline policy for the S3 bucket. Tell the bucket to let our OAI user have the read access.
- Now only through the CloudFront can we access the bucket files.
1 | # Load named profile |
Demo Granting Anonymous Access with Object ACLs and Bucket Policies
- Grant anonymous access to an individual S3 object
- Grant read permissions to everyone using the object’s ACL (Resources based policy)
- Use a bucket policy to grant everyone permission to perform the GetObject action against the object (identity based policy)
-
Note even if we logged as the IAM who has full access to S3 object (owner). When we try to access a certain file in S3 bucket. We will still get Access Denied response. Why is that? Because when we click the link to access S3 object, our browser will make an anonymous request to the object, which doesn’t not include any authentication information with it.
-
Note if you are trying to modify bucket policy to give public access to a file. You have to make the bucket public first.
Encrypting S3 Objects with KMS-managed Keys
- Generate a new CMK
- Enable encryption on our S3 bucket (existing files in bucket will not be encrypted)
- Verify that unauthorized users can’t decrypt data
Summary
- Use KMS to create customer master keys
- Use the key policy to grant principals permission to use the key
- To encrypt data on an existing EBS volume, snapshot the volume, and make an encrypted copy of a snapshot
- Enabling KMS encryption on an S3 bucket doesn’t encrypt existing objects.
- Don’t delete a key that’s being used to encrypt or decrypt data! (you can’t decrypt data after key’s deleted)
- To control access to S3, you can use access control lists, bucket policies, or user policies(identity based policies)
- Use object ACLs to grant anonymous access to individual objects
- Bucket policies contain the principal element while user policies don’t
Part Five: Protecting Data in Transit
- Encrypting data between users in public internet and AWS cloud
Transport Layer Security (TLS)
- People sometimes incorrectly call this SSL(secure sockets layer, which is the old technology that nobody uses anymore)
- HTTPS uses TLS (S stands for security which the underlying protocol is TLS)
-
Configure application to use TLS
- Application-dependent configuration
- independent of AWS
-
Application Load Balancer (We use this in this course)
- Configure AWS application load balancer to use TLS
- Force all clients through the load balancer
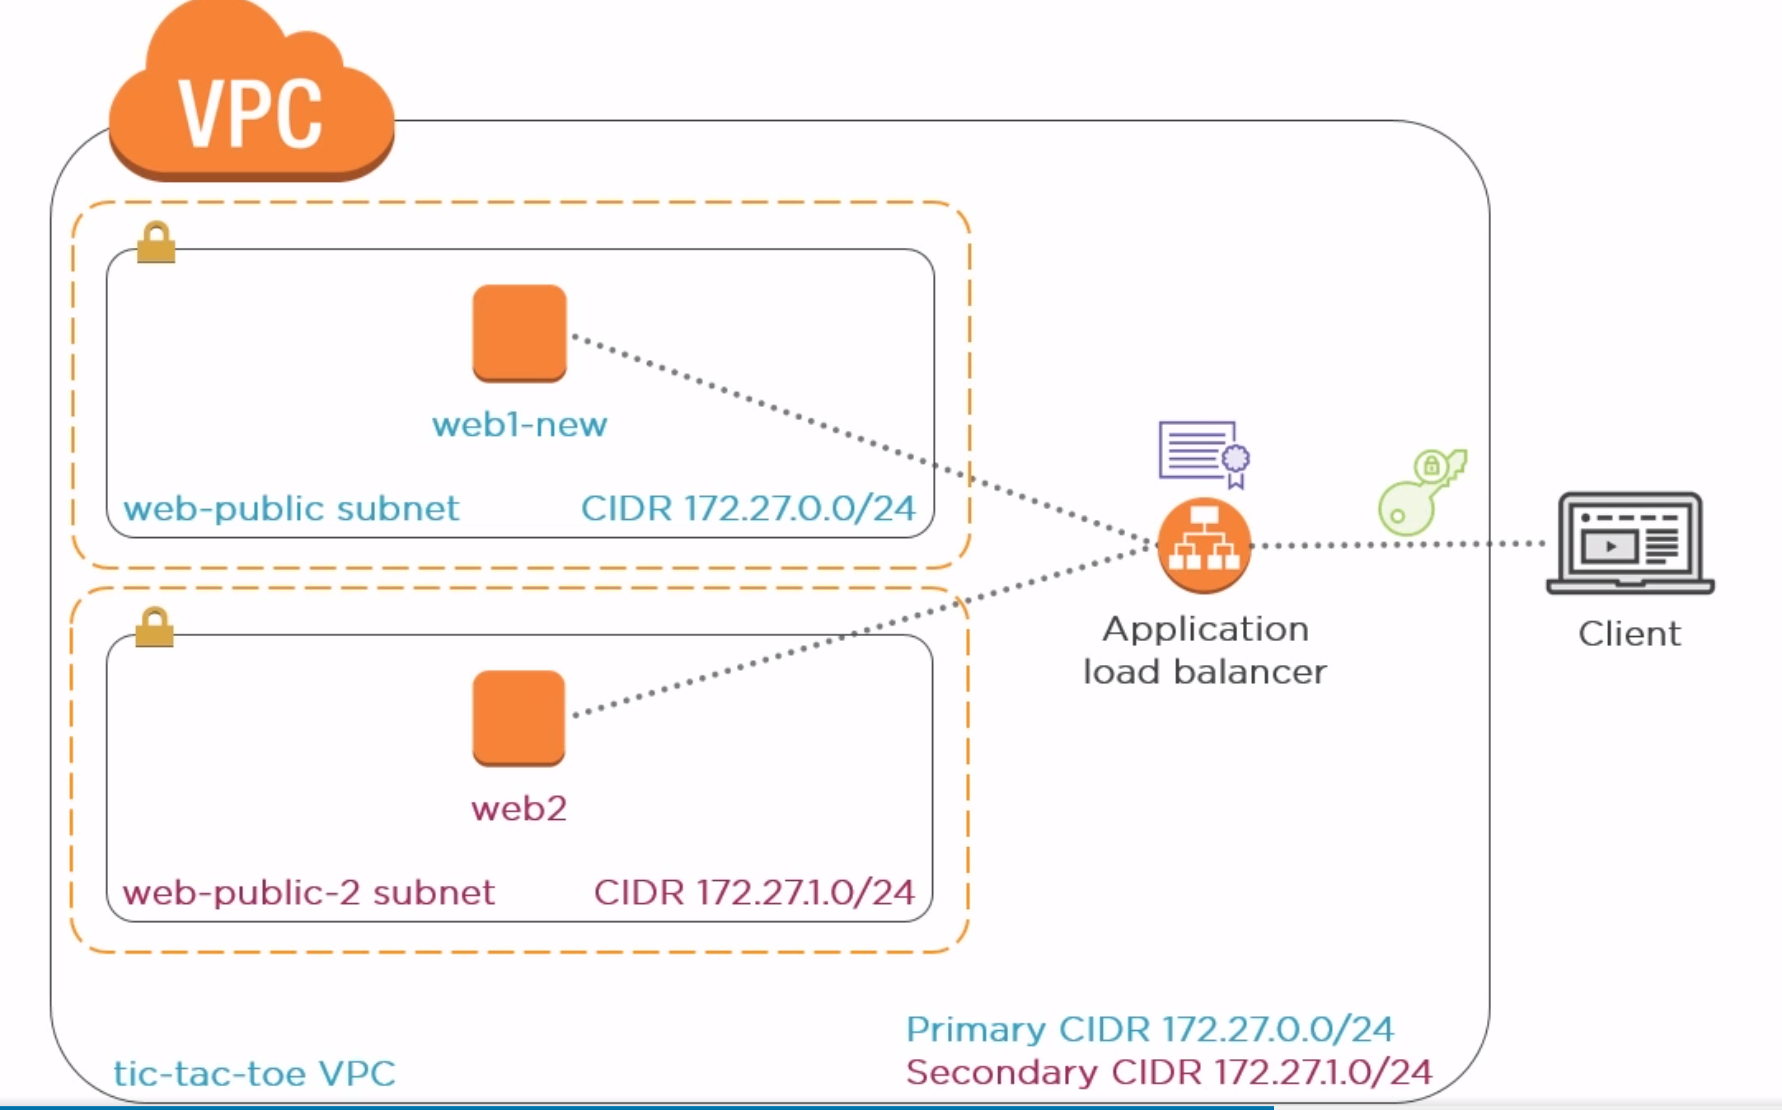
- We are going to create a load balancer and a TLS certificate using AWS ACM, then install the certificate on the load balancer. All users need to access the load balancer to access our instances (which hosted the tic-tac-toe application). And all traffic between users and load balancer are encrypted.
Module Overview
- Prepare the infrastructure to support an applicatioin load balancer
- Create a secure Application load balancer
Demo Preparing for the Load Balancer
- Create a new subnet in a different zone (load balancer requires instances to be at different AZs)
- Bring up an instance named web2
- Launch the application
- Reconfigure security group (permit access to/from load balancer)
Demo Creating a Secure Application Load Balancer
- Use the AWS Certificate Manager to create a TLS certificate
- Create an Application Load Balancer
- Create a DNS record for the application
- Browse to the application using HTTPS
-
If you use Route53 to control the DNS records of your domain. You can let AWS create the CNAME record for you.
-
To create a load balancer, you need to specify the following
- Load Balancer type: HTTPS, internet facing
- VPC AZs (tic-tac-toe)
- Security groups (tic-tac-toe)
- Routing (new target group HTTP:80 to both instances)
- Register both instance as load balancer targets
- DNS name is the load balancer name we can browse to
- Create an A record in Route53 convert load balancer DNS name to a friendly domain name.
-
Now you can browse to the URL using HTTPS
Summary
- Choose where to terminate the TLS connection
- Individual instances (you need to configure TLS connection of your application and install TLS certificate on each instance)
- Application Load Balancer (only need to install one TLS certificate on the load balancer)
- ALB requires two availability zones
- ACM requires you to verify control of the domain name in the certificate
Part Six: Configuring Data Backup, Replication, and Recovery
Module Overview
- Versioning
- Lifecycle rules
- Cross-region replication
Demo Versioning
- Versioning prevents accidental deletion and overwriting of data
- Enable versioning
- Upload object
- Restoring versions
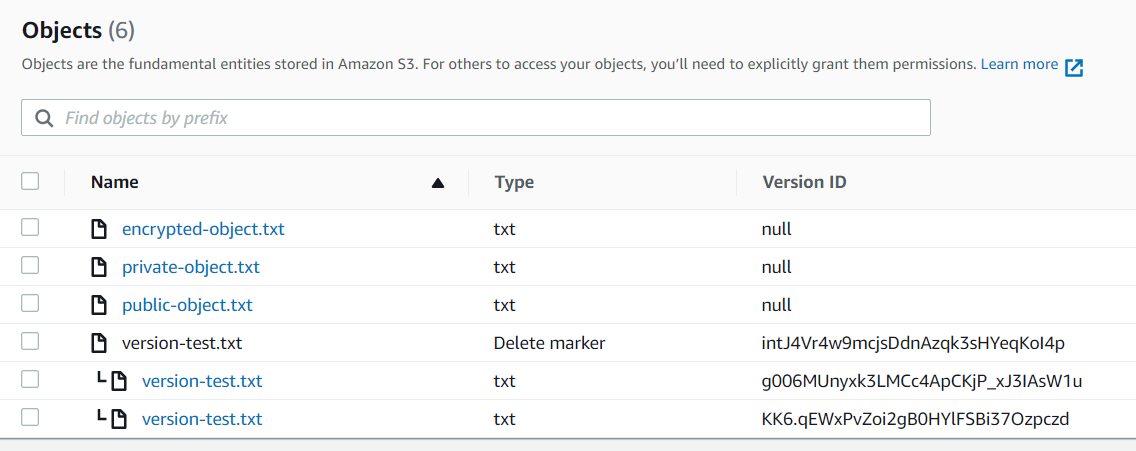
- After you enabling the versioning of a S3 bucket, when you deleted a file. AWS will not delete the file but instead hide it and give the file a deletion marker. In the version list, you can see all versions of the same file. And if you delete the version with deletion marker, you can bring the deleted files back.
Lifecycle Management
- Different storage classes provide different levels of redundency
- Standard is the default storage class
- Automatically migrate older objects to a cheaper class
- Automatically delete old objects
Demo Liftcycle Management
- Examine object storage classes
- Create a lifecycle rule
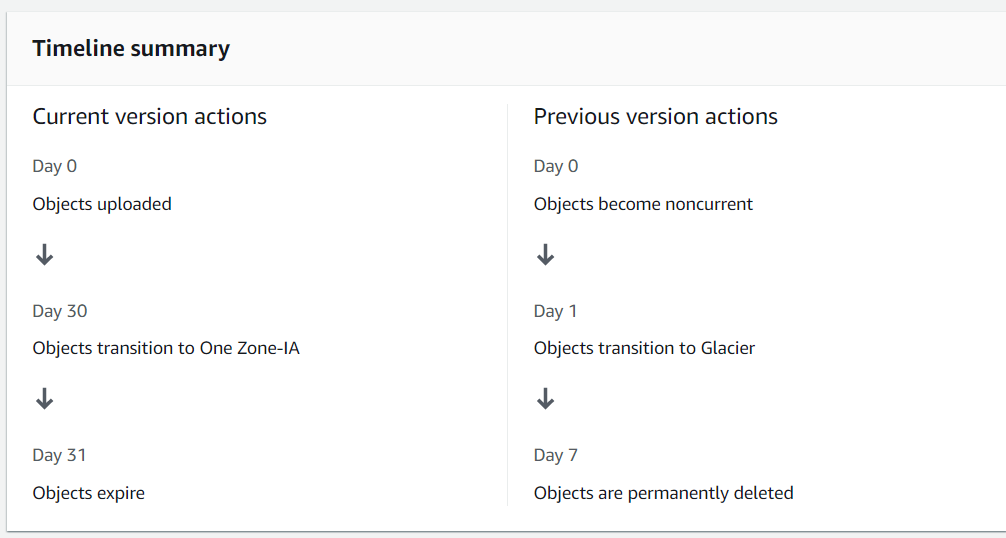
- This image explains the current lifecycle I set up for the bucket.
- On day 30, objects will be moved to One-Zone IA
- On day 31, objects will be added a delete marker and become previous versions
- On day 32, objects will be moved to Glacier
- On day 39, objects will be deleted permenately
- Note, small objects in Glacier will have higher costs (objects < 128KB)
Demo Cross-Region Replication
- Congifure cross-region replication
- Replication doesn’t include existing objects
- When enable replication rules
- choose destination bucket
- choose keys to decrypt data in source bucket
- choose keys to encrypt data in destination bucket
Summary
- Versioning
- Every change results in a new object version
- deleting an object creates a marker
- delete the marker to restore the object
- Lifecycle Management
- Move objects to different classes
- delete objects
- Cross-region replication
- Synchronously copy new objects to a different bucket
- Replicating to a different region offers protection against local catastrophes
Couse Summary
-
Remember that the goal of security is protect the confidentiality, integrity, and availability of data. It’s that CIA triad.
-
Protecting AWS Credentials: At the start of this course, you learned how to configure identity and access management. This is like the building security system. It controls who can enter the building, what rooms they can go into, and so on.
-
Capturing and Analyzing Logs: After that, you learned how to capture and analyze logs using CloudTrail and CloudWatch. In a physical building, this would be the building’s cameras, security guards, and log books. You’re not just concerned with what should happen, but what did happen. You want to know everything that’s going on inside that building.
-
Protecting Network and Host-level Boundaries: However, perhaps the nature of your particular building is such that it’s not practical to identify everyone that exits and enters. If you’ve got a business that has clients coming in and out all the time, making them sign in and sign out can be a burden. In that case, you need a different way of controlling access to the building. This is analogous to protecting network and host-level boundaries in your AWS environment. Think of security groups and network access control lists. You’ll let strangers in your building, but you’re going to be strict about where they can go and what they can do.
-
Protecting Data at Rest: Next, you learned how to protect at rest using encryption and access controls. Think of a combination safe that contains a secret message. The safe is locked in a room that you have to use a badge to gain access to. First, you swipe your badge to get into the room, and then once in the room, you must possess the correct combination to open the safe.
-
Protecting Data in Transit: Next, you’ll learn how to protect data in transit by way of, yes, encryption. Again, if you want to take a top secret document out of the building and deliver it to someone, you might stick it in a locked briefcase or perhaps hire an armored courier to transport it for you. As long as the document is outside of the building, it remains under lock and key until it gets to its destination.
-
Configuring Data Backup, Replication and Recovery: Lastly, we looked at how to perform data backup, replication, and recovery. Basically, if all else fails and your data does get destroyed, at least it’s not gone forever. You can get it back.

